

How Professional Tutus Are Made
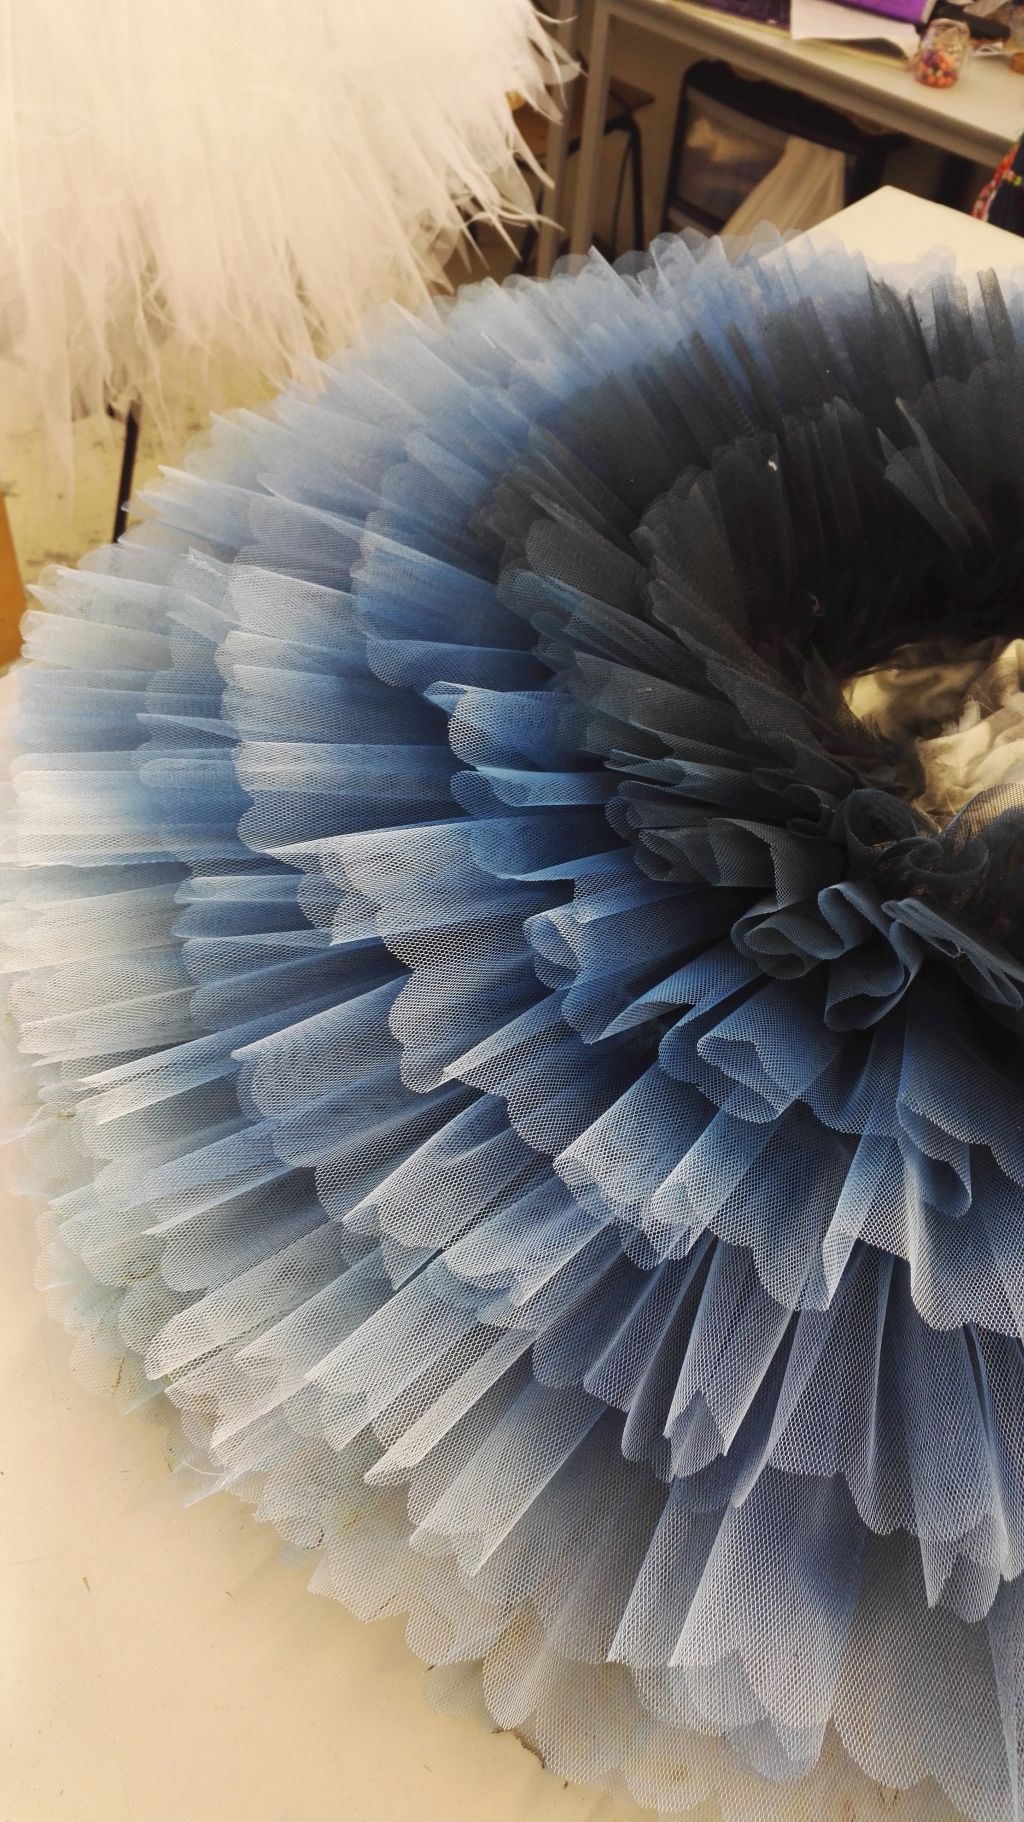
For anyone wondering whether this is me making up cute names, I can assure you that Pancake Tutu is actually the proper technical term for the currently most popular tutu shape. And just like pancakes, they come in varying thicknesses. The tutu is usually made with around 10 layers of stiff tulle, so the amount of layers and the gathering technique used to fit it to the knickers will determine its final shape and fluffiness.
Now there seems to be a certain mystery surrounding the build of this tutu and how it manages to hold its shape. Usually when fabric is gathered into a waistband or similar construction it’ll droop, even stiff fabrics aren’t able to jut straight out from the body without any form of support. And while being told “oh there’s a bone in there” certainly does explain something, that is definitely not all there’s to it. I personally found it very hard to imagine and only properly understood it once I had made my own very first tutu. So here’s to a complete run-through of how to make a Pancake tutu by yours truly!
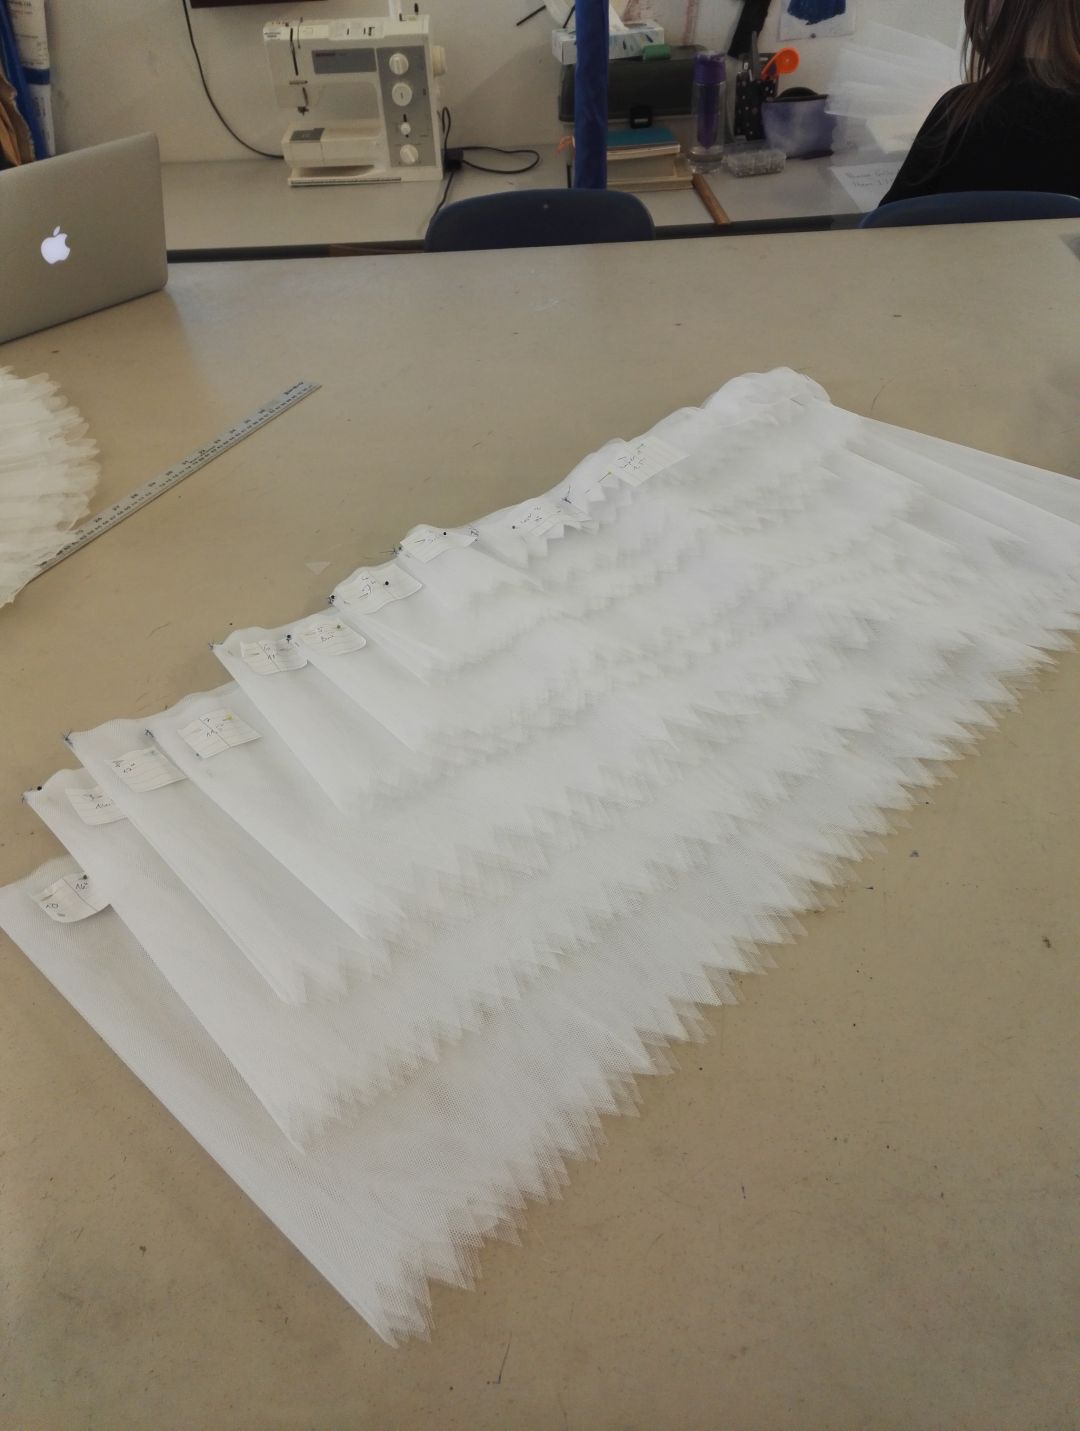
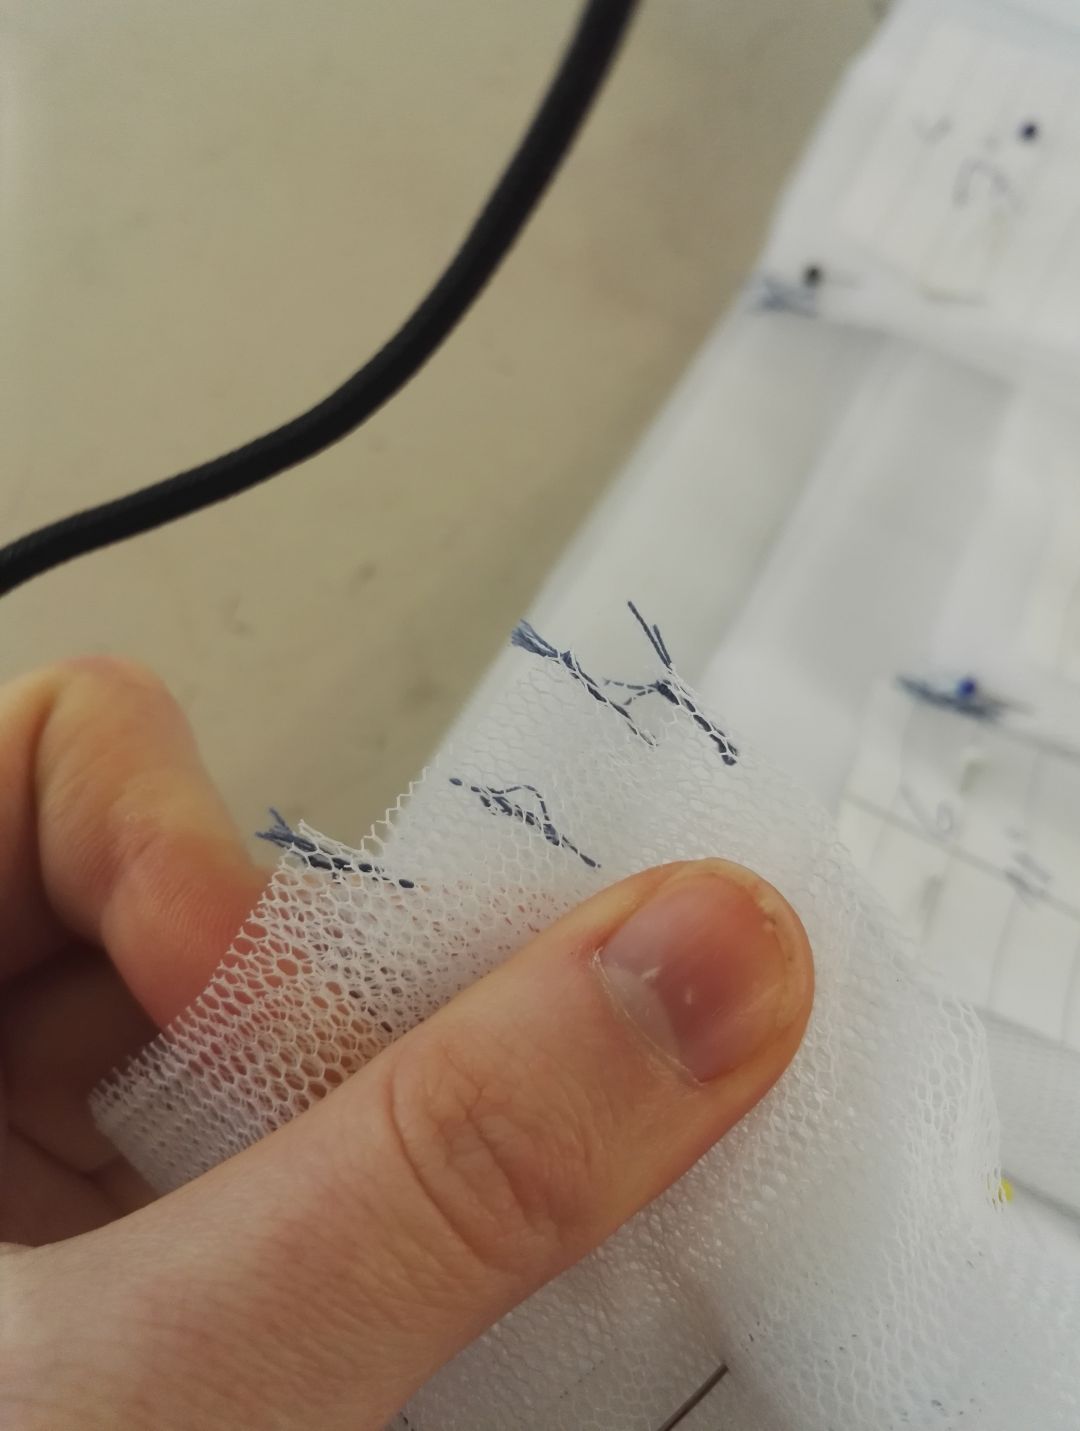


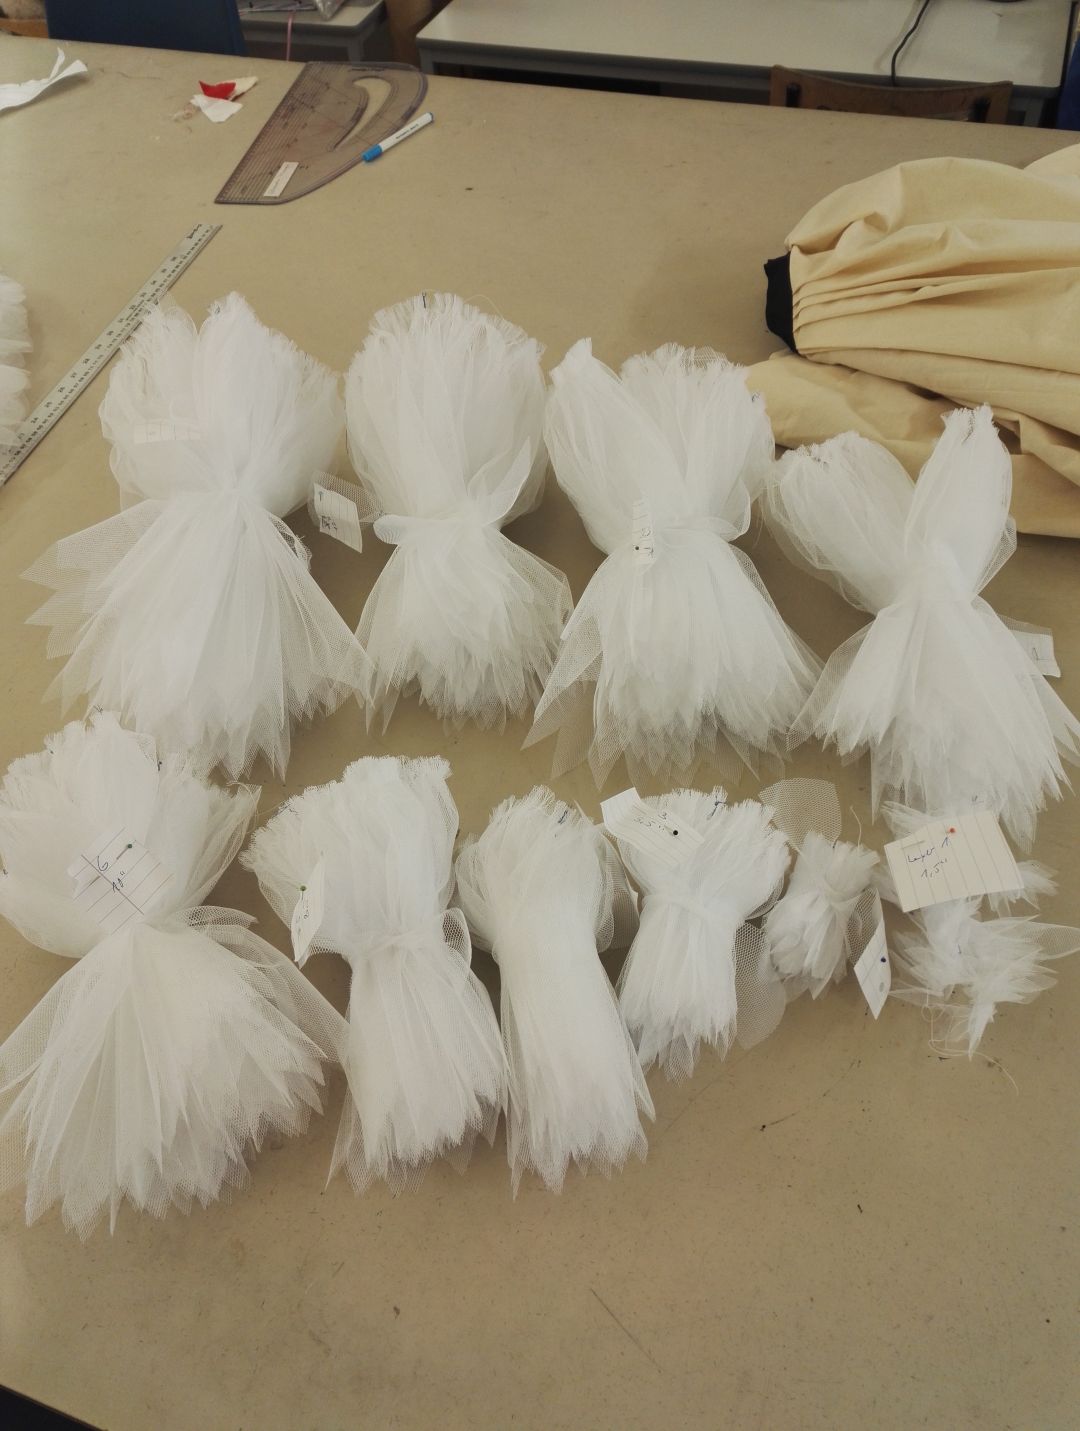
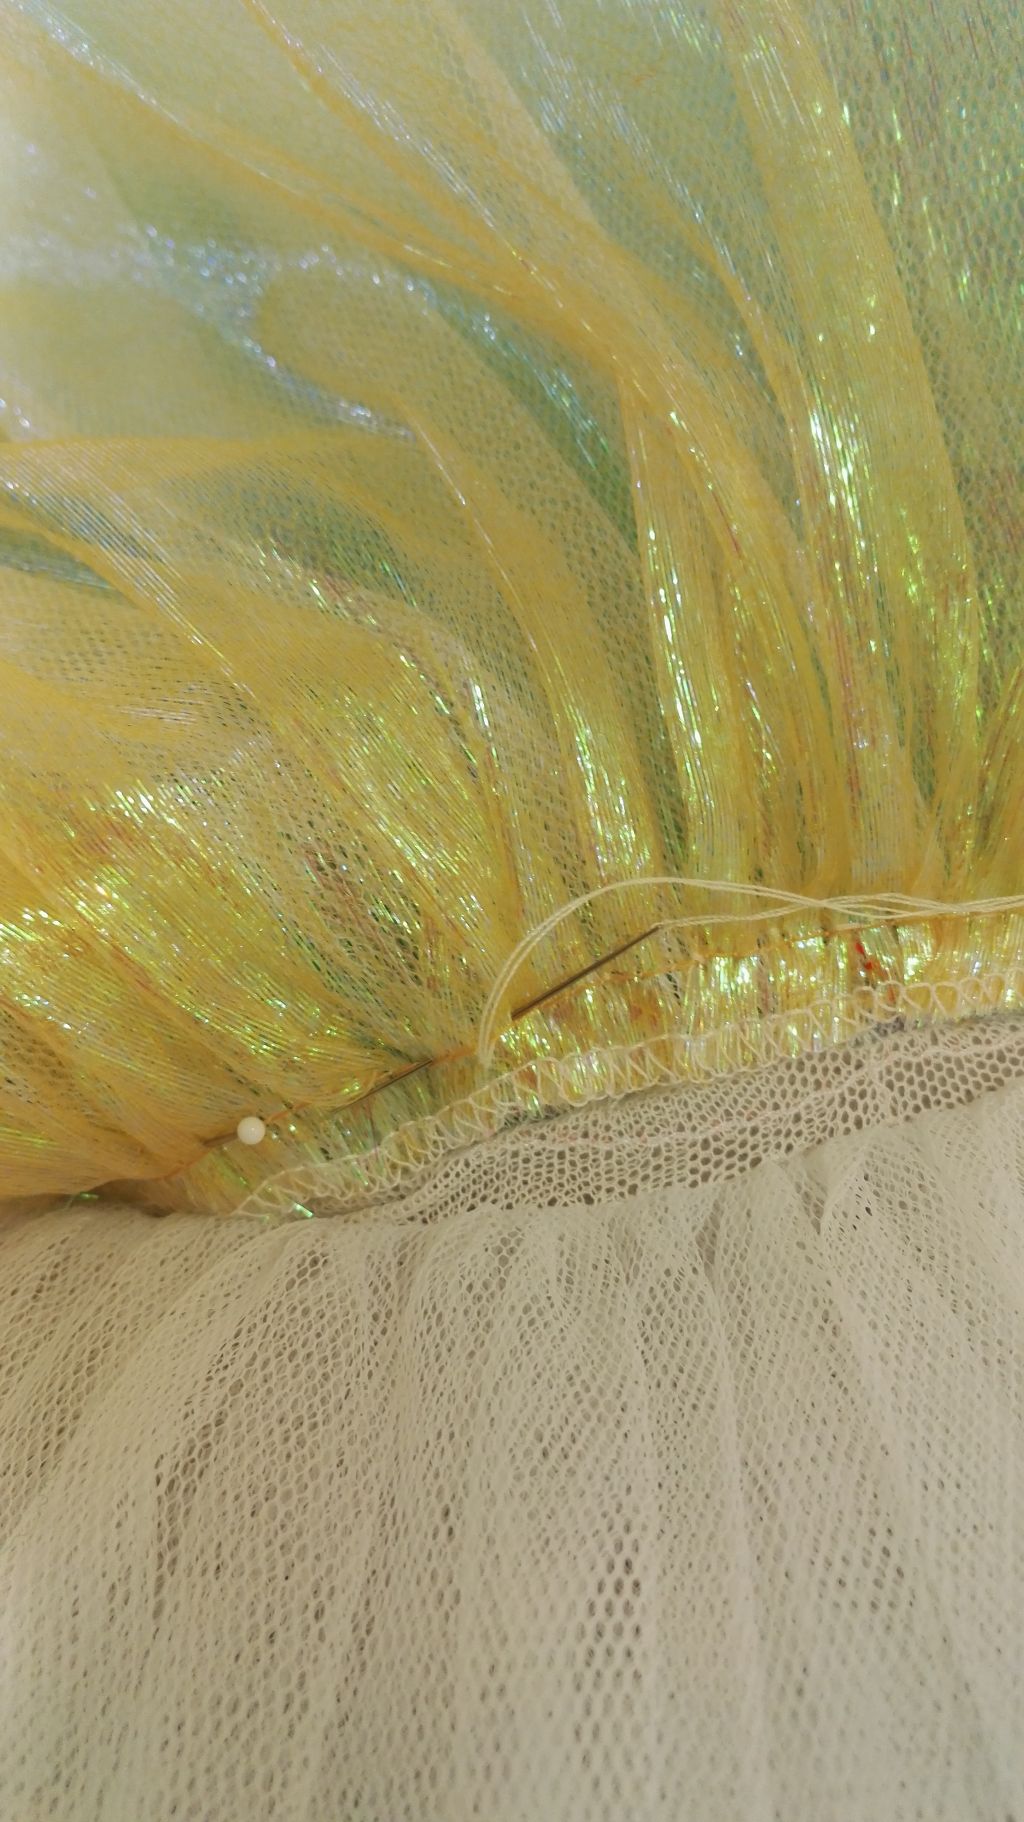
My pancake tutu has 10 layers of tulle. Once those are all cut, the edges are dagged (or scalloped for a softer look) and the layers labelled. This is essential, otherwise it would be very easy to mix them up and sew them in on the wrong line later on. Most layers are so wide that several pieces have to be sewn together in order to create one very big one. Each layer is folded in half three times and the eights are marked with thread. After that all that’s left is gathering the huge amount of fabric. The best way to do this is manually pushing the fabric under the foot and sewing across, making sure the distance between the thread markings is reduced to approximately 6 inches. This should work for most ballet standard sizes (very small!). A channel is sewn onto layer 7 (shown in the next photo gallery).


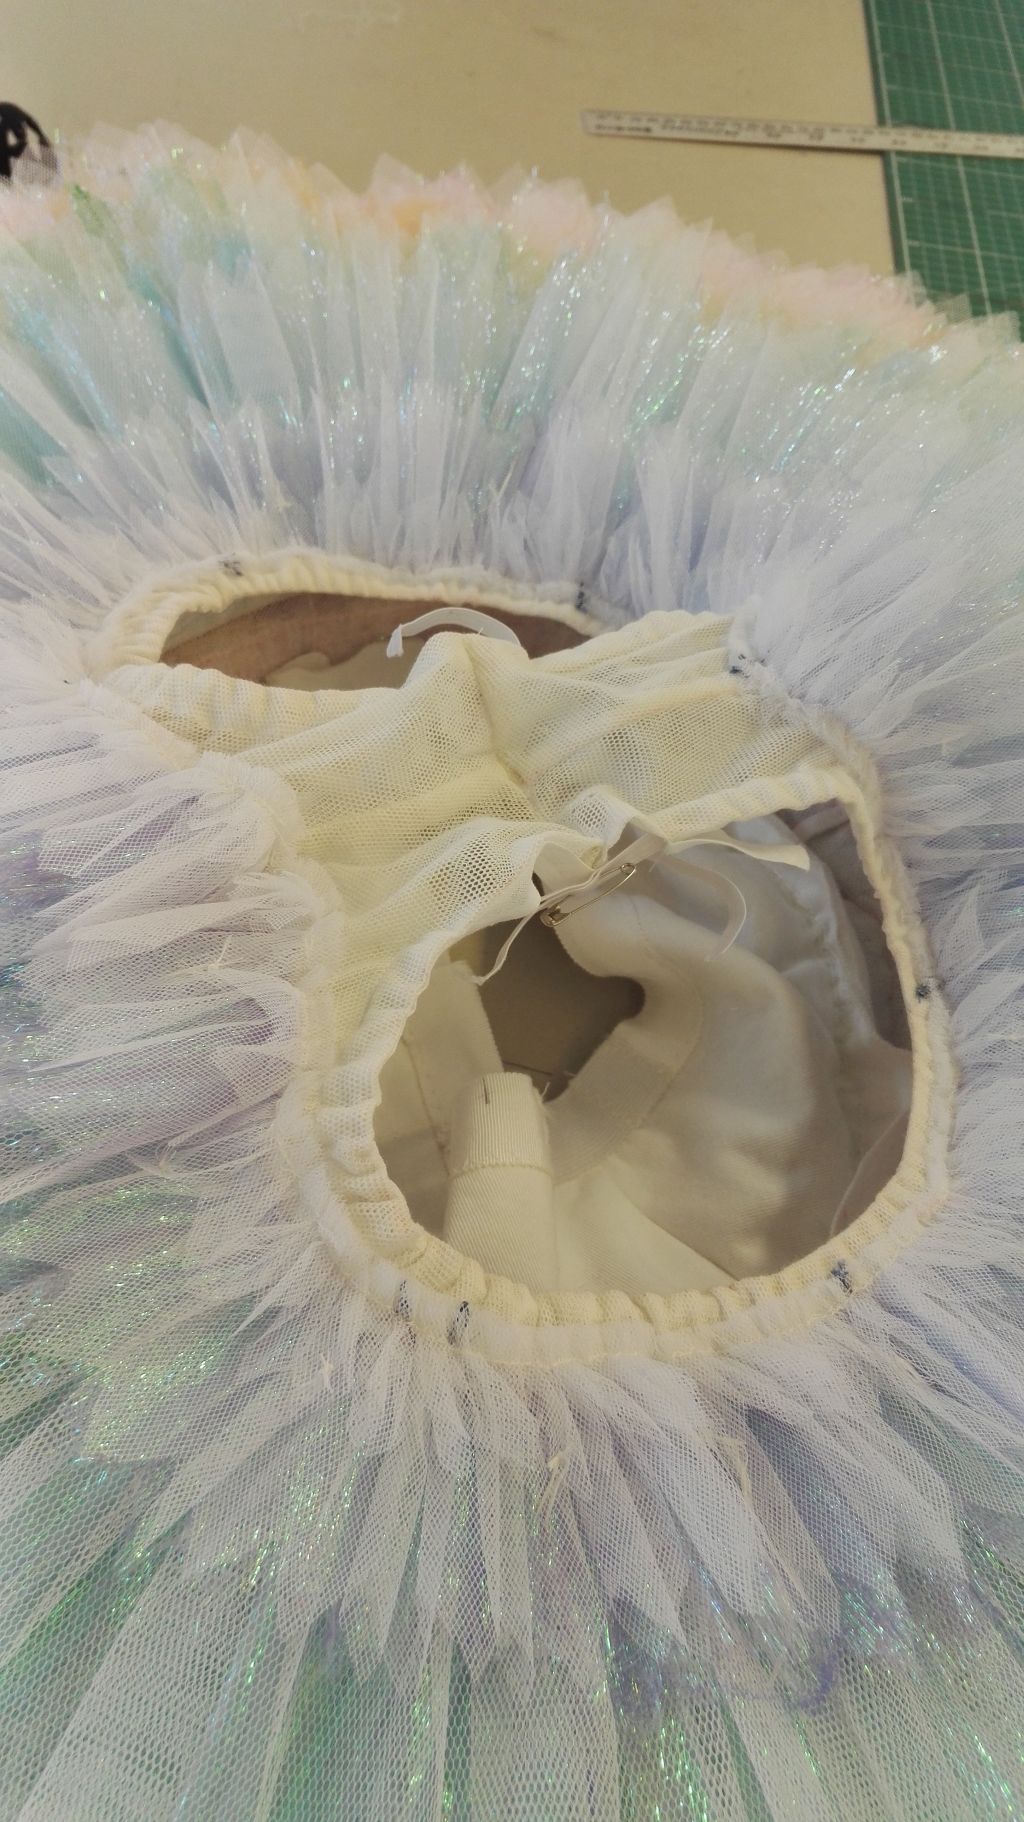
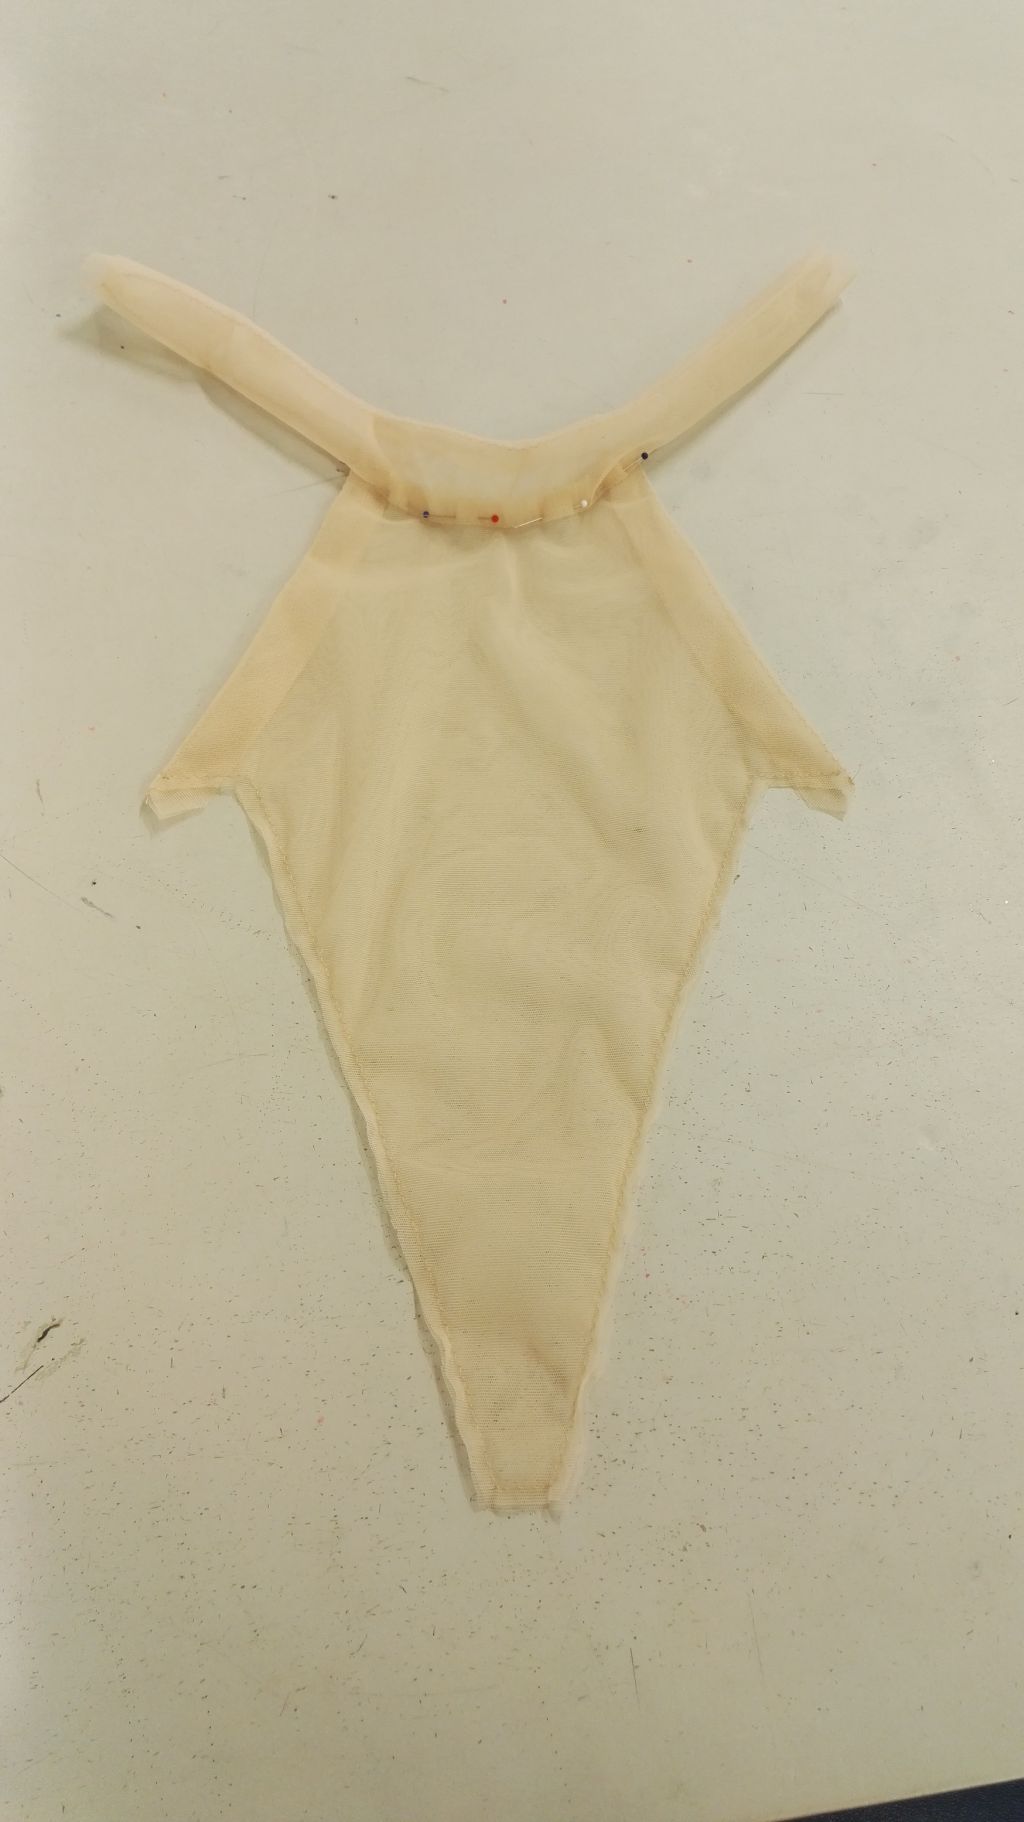
Next up are the knickers. They are made from an expensive fabric (well at least for my student budget…) called bobinet that is essentially a cotton mesh and therefore more breathable and softer than polyester. The legs are finished off with cotton bias binding to create channels. The start and finish are purposely left unfinished as the crotch seam isn’t closed yet and won’t be for a while. This will allow me to alter the crotch seam later if it is necessary to make the knickers fit a longer lower body plus it makes it easier to put the tutu on a dressform. The bottom half of the knickers centre back seam is closed in a French seam, the top half is folded inwards twice on each side and stitched down to create a placket.
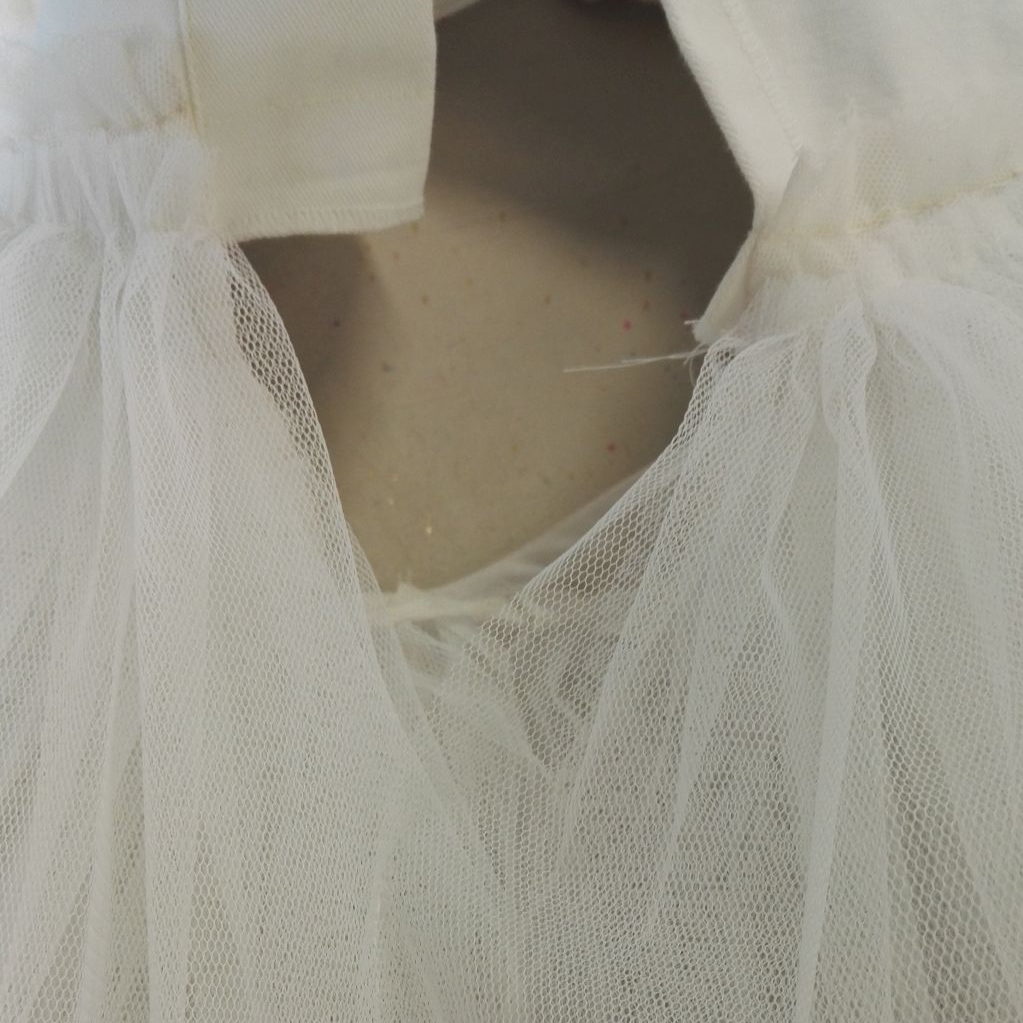
Now we finally get to one of the tutu tricks™ that will make it stick out as we like it! While the upper layers are sewn on downwards with a seam allowance at the top it’s the exact opposite for the lower layers. They sort of meet in the middle and push up against each other.


The netting layers jut out from the hips, however it is much safer to wear a garment on the waist so a basque is added. This essentially builds the bridge from waist to hips and gives additional stability. It is made from drill and finished off with a petersham tape at the top. At the sides the tape is replaced with elastic. Contrary to what one might expect, the wrong side with the seams is towards the outside so that the right side which is the smoothest is on the dancer’s body and nothing irritates them. As can be seen in the second picture, the knickers are handstitched to the basque at the top. Then the centre back seams on the netting are closed, leaving a gap in the top layers that decreases in size the closer the layers are to the lower end of the opening. That way the dancer can get in and out of the tutu.
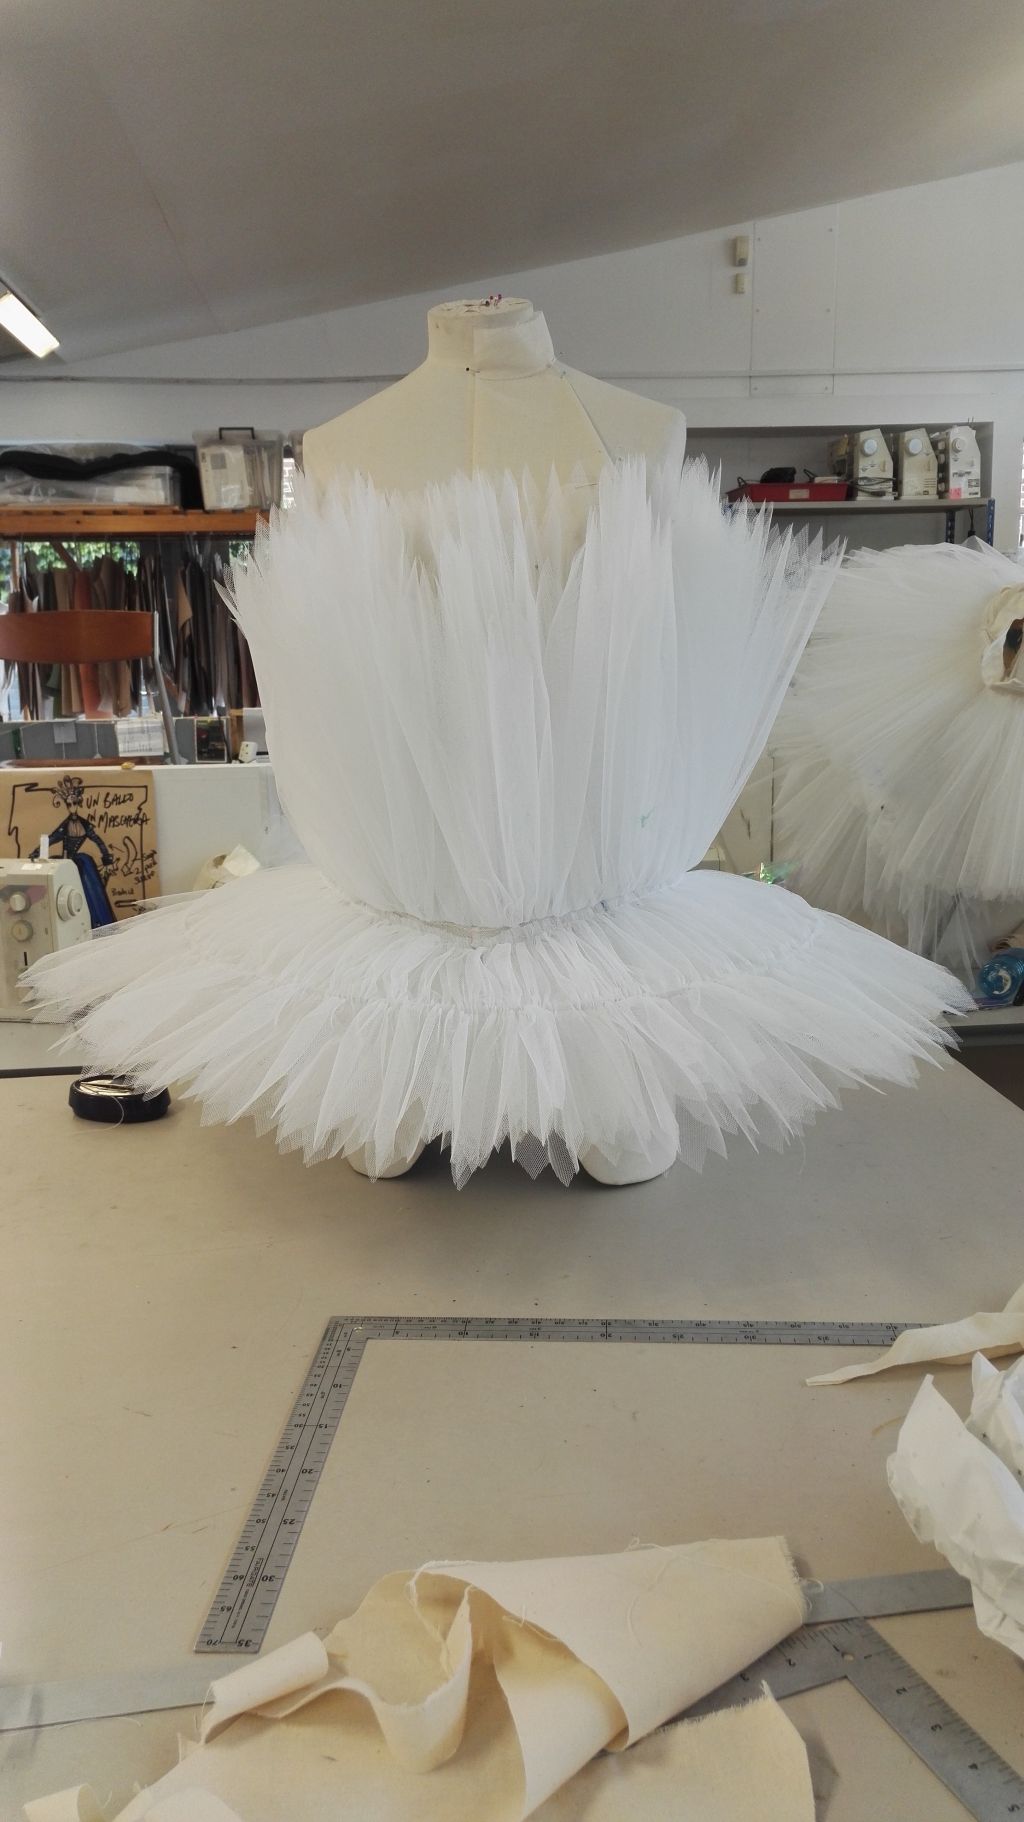

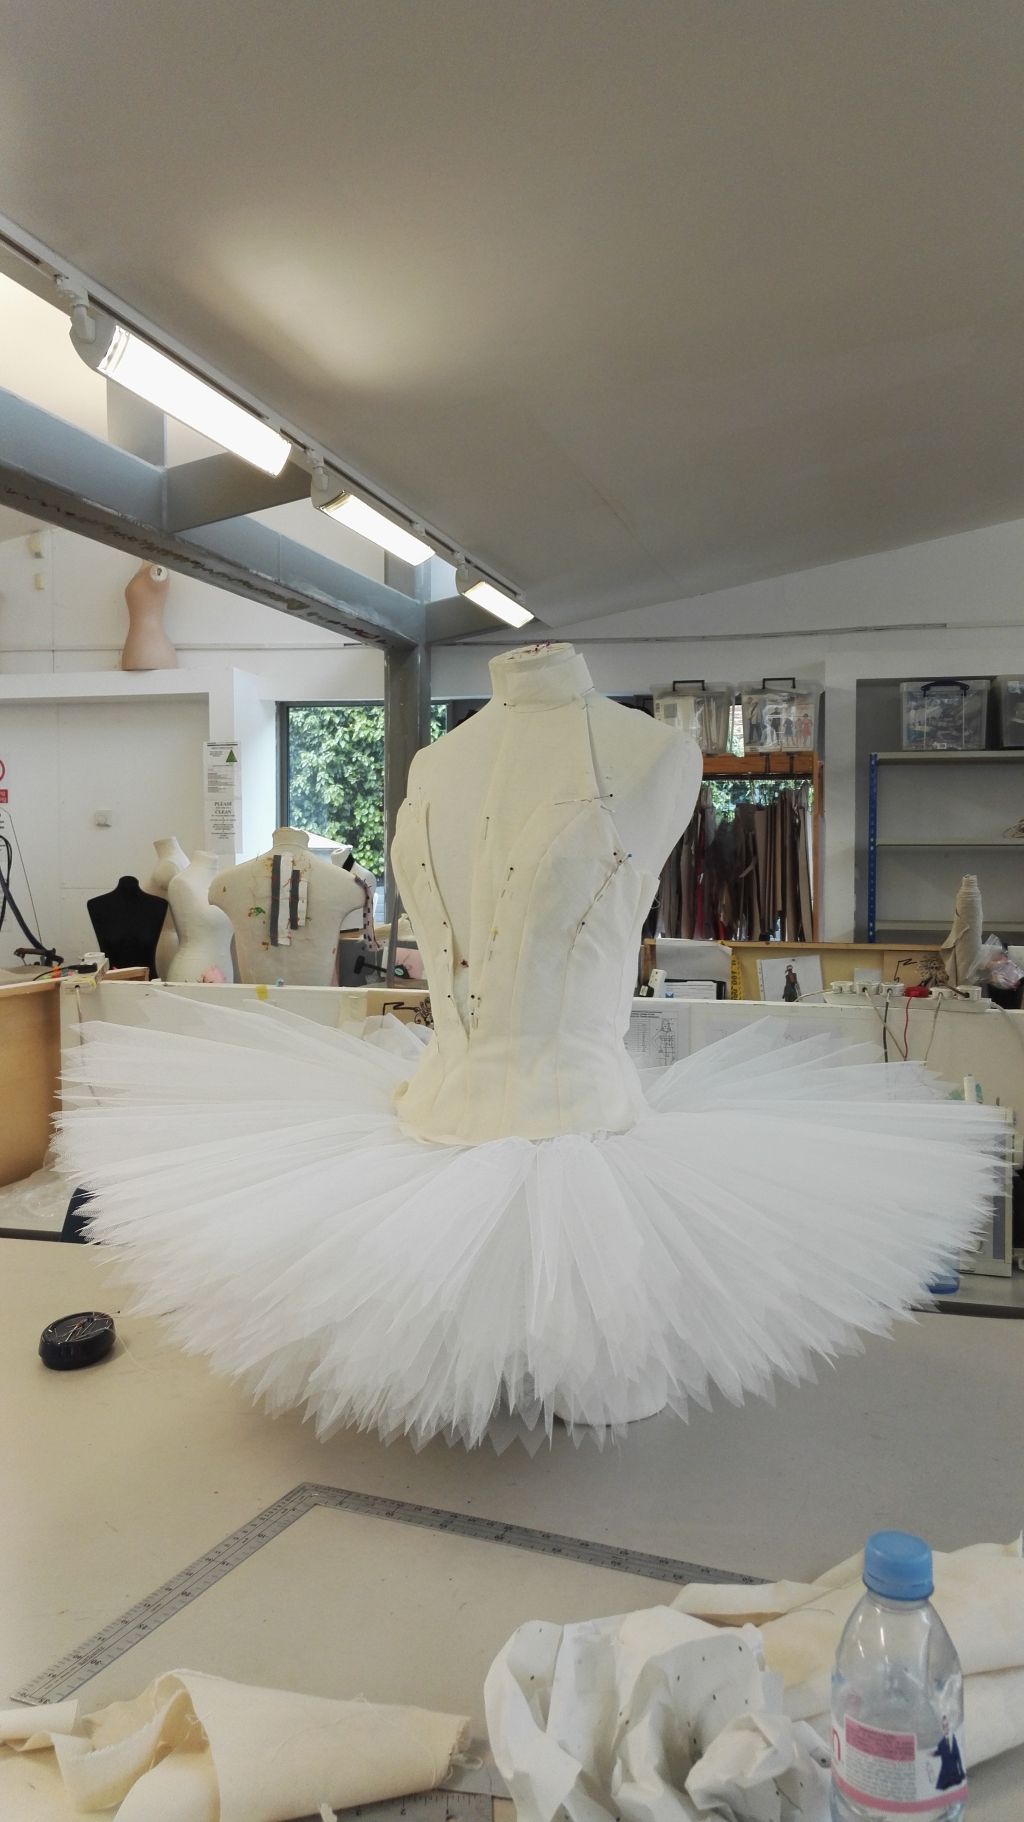
I hinted it earlier, here is another tutu trick™. To facilitate the process I put the tutu on a dress form and pinned up the upper layer (it is easiest to use an elastic for this, don’t do it like me). I used a 6mm plastic coated steel bone and inserted it into the channel on layer 7. The result is a very fluffy an unruly tutu, but we’ll get to that.


At this stage it is time for the first fitting! Things that need to be checked:
- Crotch seam: if the tutu is sitting too low, fabric needs to be taken out of the crotch seam
- Balance: the tutu shouldn’t droop. Check if front, sides and back are at the same level.
- Basque and knickers: do they fit correctly around the waist and hips


Now for the part where my tutu diverges from the classic procedure. When I was still in the fabric sampling process and we didn’t yet have a design I played around with some of the sparkly fabric I got on my Goldhawk road sampling spree and put in in between the layers of my plain white tutu and loved the subtle sparkly effect it created.
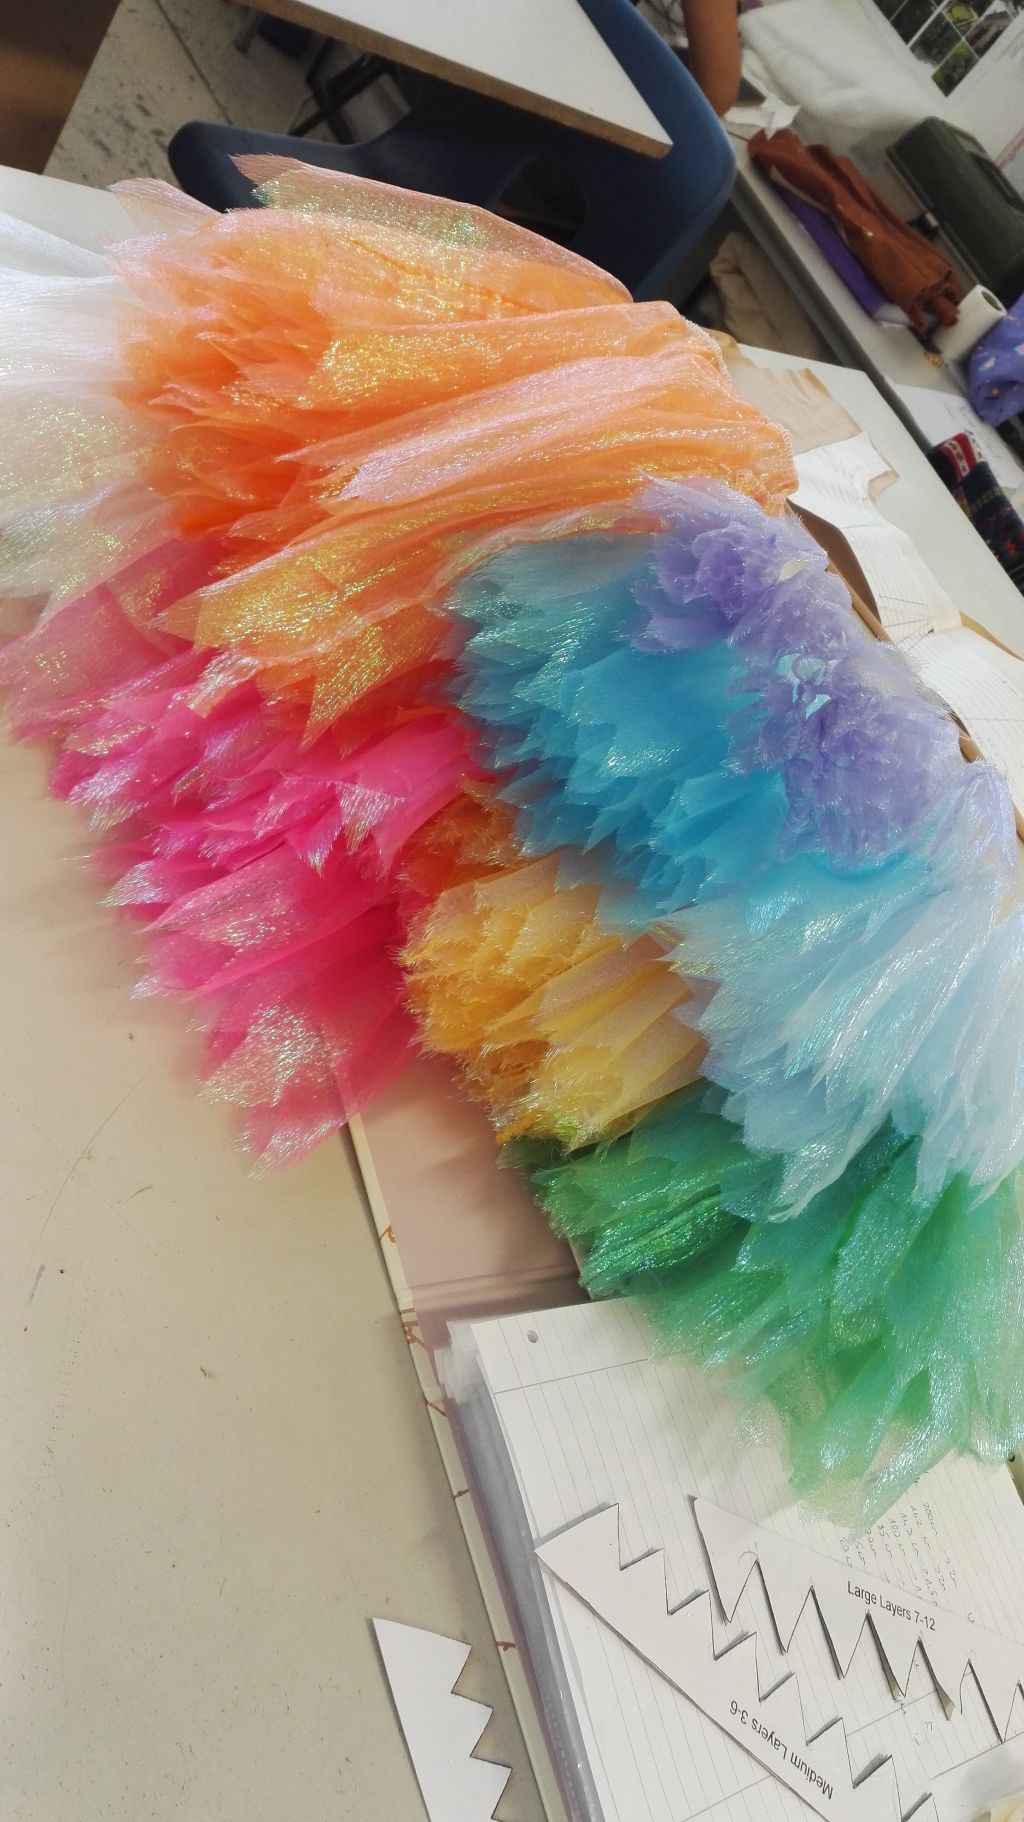
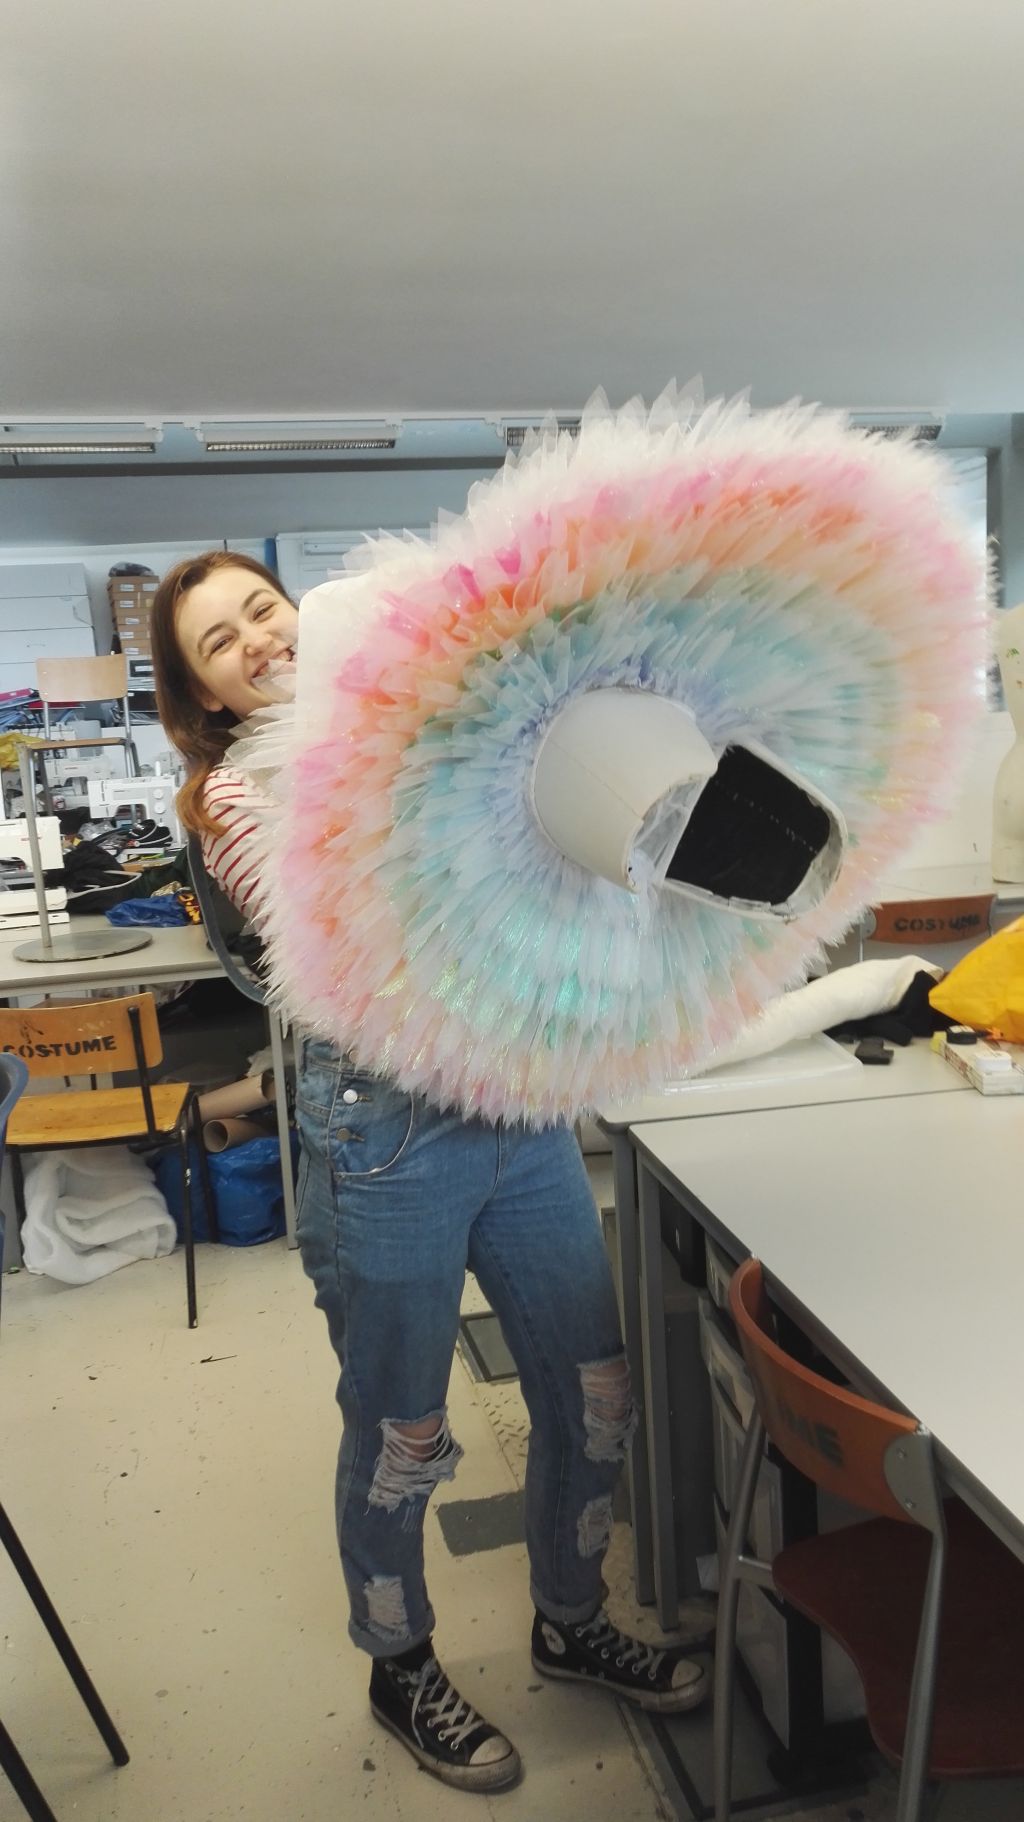
My designer Niamh and I knew from the start that we wanted to make an unconventional firebird. Rather than using classic red, orange and yellow tones we decided on a colour palette that included all the possible colours a flame could be and honestly I think there is no colour that doesn’t exist in flame form. So after conferring with Niamh I went to visit Goldhawk road again and got the whole rainbow. I mistakenly labelled the fabric as organza and later on realised that I was wrong, it is NOT an organza. The fabric consists of thin iridescent plastic bands lengthwise that are held together with a wavy coloured thread loosely woven widthwise. This gives it a slight stretch which I don’t even need for this project but for other things it might come in handy. The process was similar to the way the netting was handled. 8 layers were cut from the iridescent fabric and dagged, then gathered, overlocked and finally handsewn in between the netting layers with a backstitch. As the tulle is white, it tones down the bright colours, making the rainbow appear pastel when looked at from the bottom. Some bright bits peek out at the sides, mostly white, pink and orange can be seen from the side. Because the fabric is woven extremely loosely, the dagged edges have frayed which gives it an honestly unplanned but welcomed effect. Kind of like flames licking at the sides of the tutu! I also added an extra layer of soft sparkly tulle on top that makes it appear a bit softer when seen from above.


The next stop is flattening the tutu. It is left under a board for about a day which significantly helps to control the volume. Alternatively it can also be left under a mattress or something similar in size and weight. My tutu still isn’t completely flat because I added so many layers but that’s fine! I want it to be slightly fluffy.


6 hooks and eyes make up the tutu’s closure. It takes a while to sew all of them on but no other method is as reliable and secure so it’s worth the effort. The last picture shows the elastics in the leg channels I forgot to put in for the first fitting, they help to improve the fit.
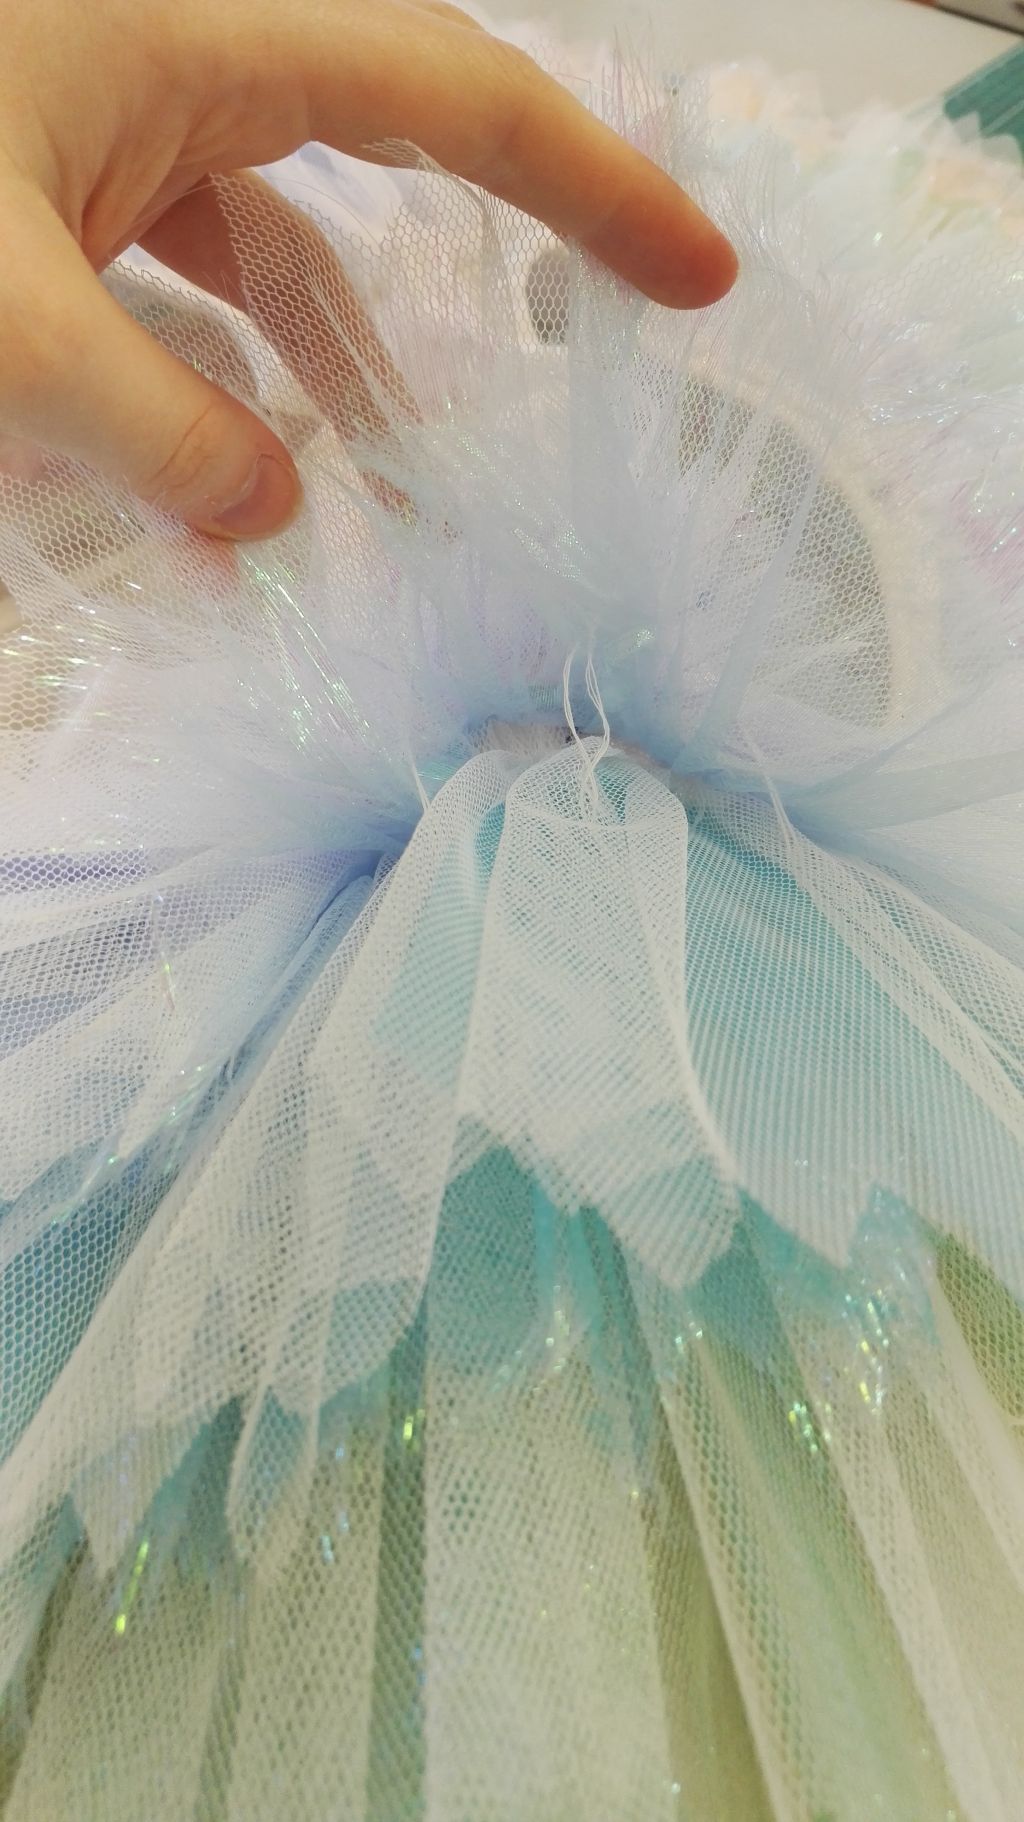


Tutu trick N° 3: Stringing/Swing-tacks! Those can make or break a tutu. They are essentially loops of quadrupled thread that connect several layers together. Flip the tutu so it’s underside upwards, stuff with a bag or cushion and mark the positioning of the tacks with pins. My tutu has just under 100. Halfway through doing mine I realised I had been doing them wrong all along and had to redo it all so here’s what I have learned:
- The swing-tacks are one simple loop. Don’t stitch through the fabric several times. Start on the underside, go through the layers you want to catch, come back up and make a cross knot (double knot where the second one is tied in a way opposite to the first one.
- They go diagonally through the fabric rather than vertically! Essential for flexibility and bounce~
- Keep them loose. Looser than you’d think, they will do the job nevertheless
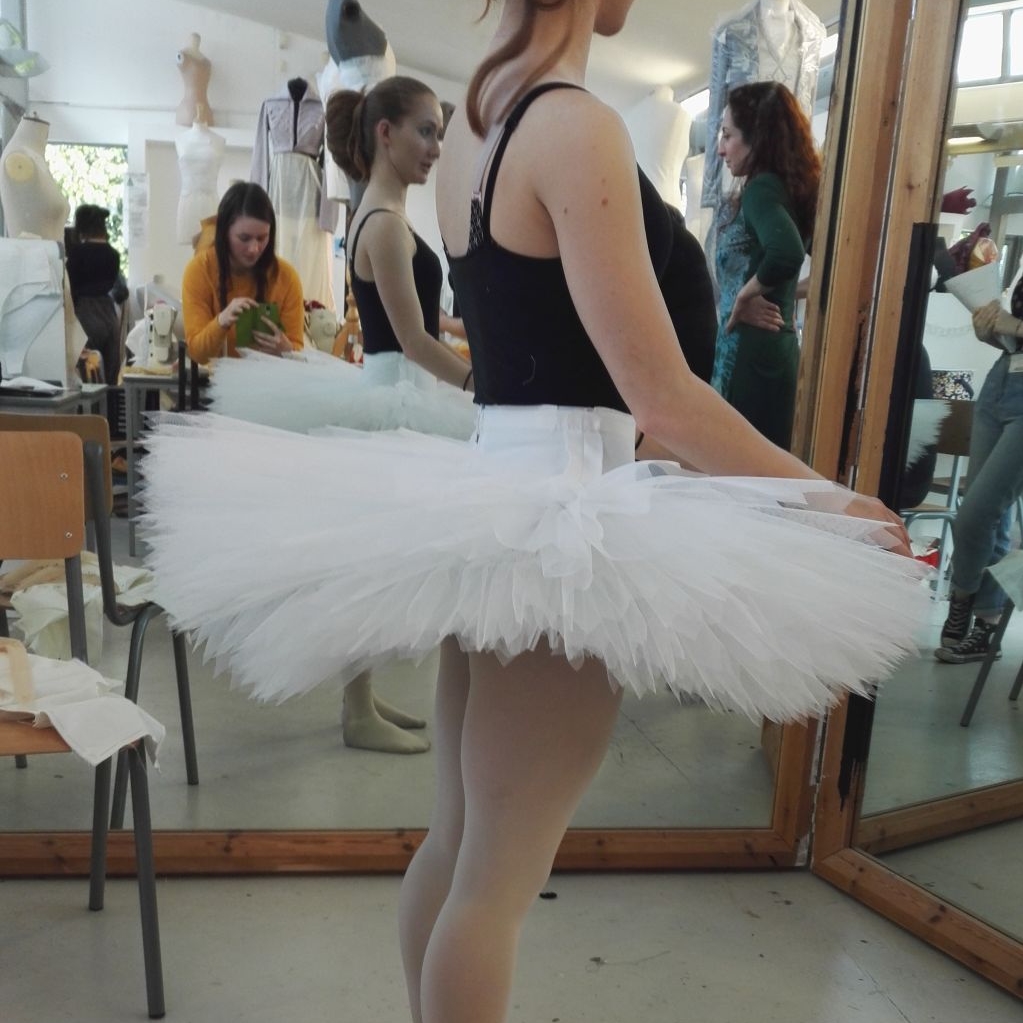
There’s quite obviously a big improvement compared to the first fitting! The layers are controlled but not flat as paper.

At this point I want to point out that the standard way of adding colour to a tutu is to spray it. It is possible to create gradient effects and give it more visual depth. Leather spray is the best choice for this as it is highly adhesive. That is not to say this is an ideal solution, most of my peers have sprayed their tutus and albeit it is beautiful some of the spray came off as a powder and got onto my bodice. Not so nice!
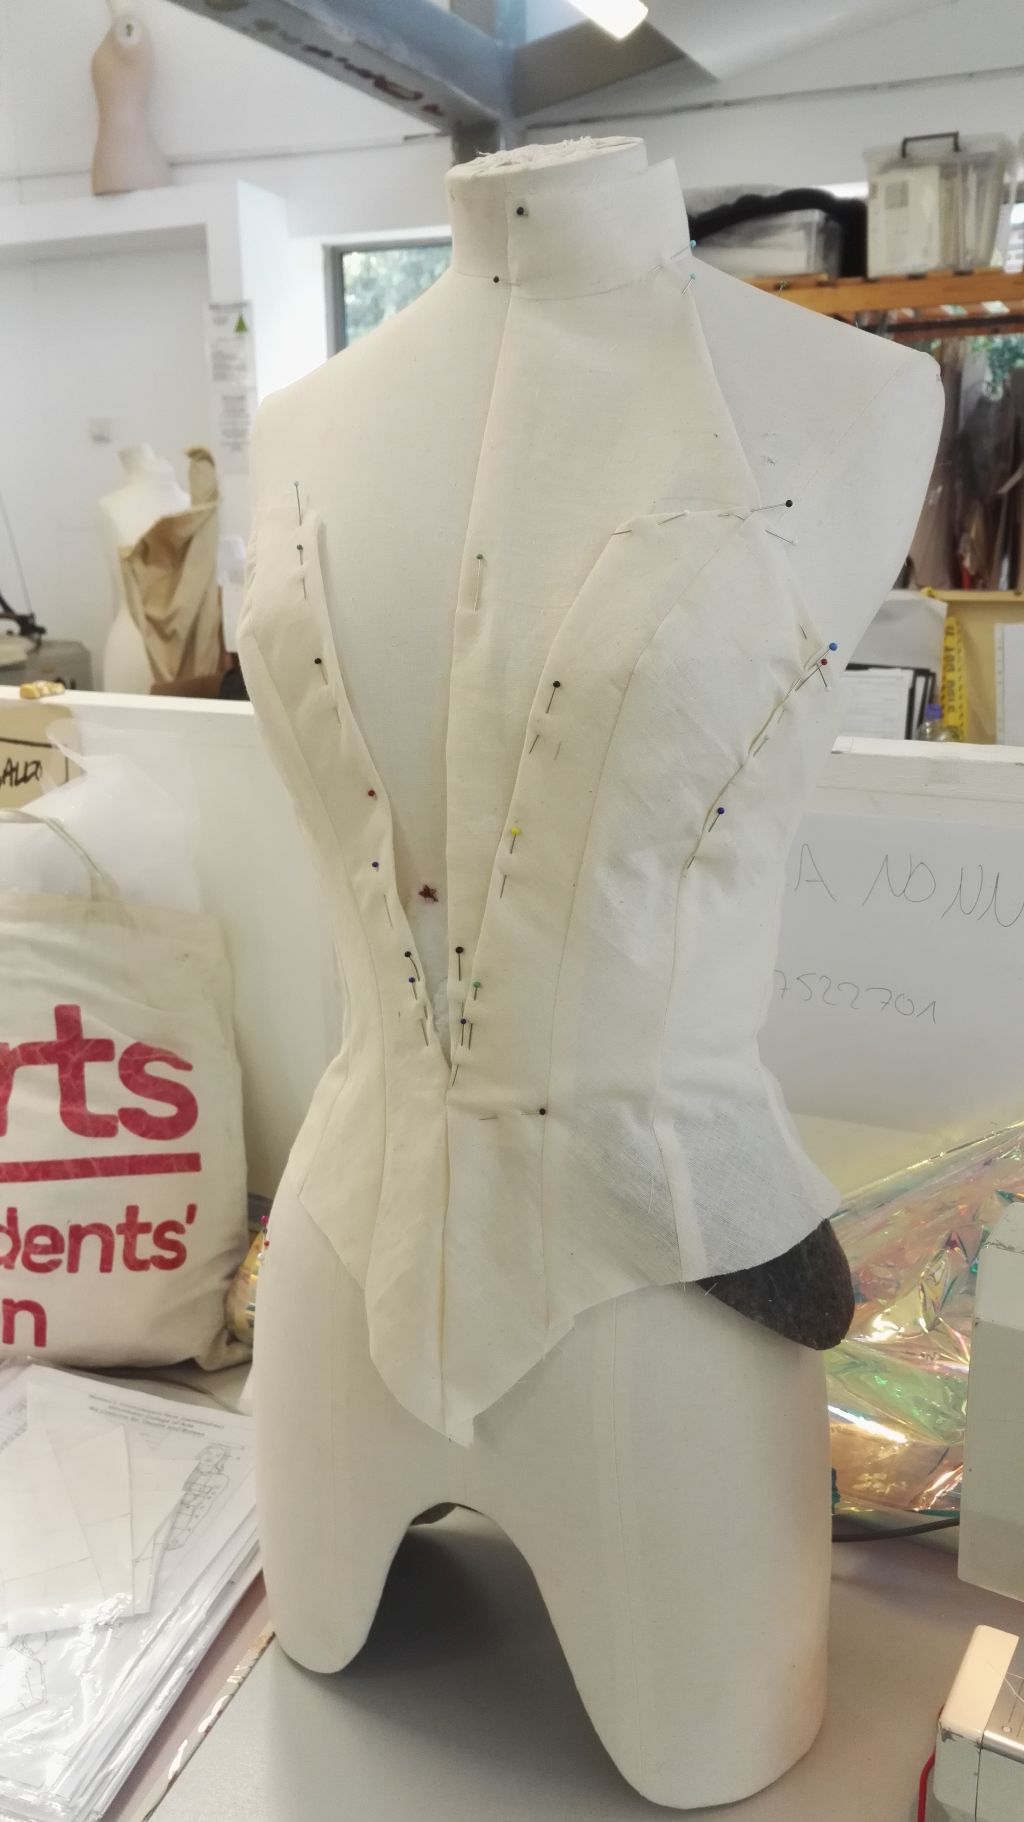

We had a basic 5-piece ballet bodice pattern in the studio that came pretty close to what I needed. I deepened the plunge neckline and took of 2cm on each side of the centre back. The minx net panel was draped on the stand. Luckily it fit almost perfectly at the first fitting, I took a out a small bit in the underbust area of the side front piece and moved the top edge further upwards. The point in the front was removed for aesthetic reasons.
The minx net panel was a bit trickier, I learnt that a) it needs to be cut with the stretch lengthwise (so the dancer can bend backwards) rather than widthwise (as that will make the bodice gape apart in the front) and b) it shouldn’t be doubled and faced as I did to achieve a skin-like appearance with minimal seams. Unfortunately my tutor only thought to tell me about b at the second fitting when I had already recut the piece on the right grain so it’s still double-layered.
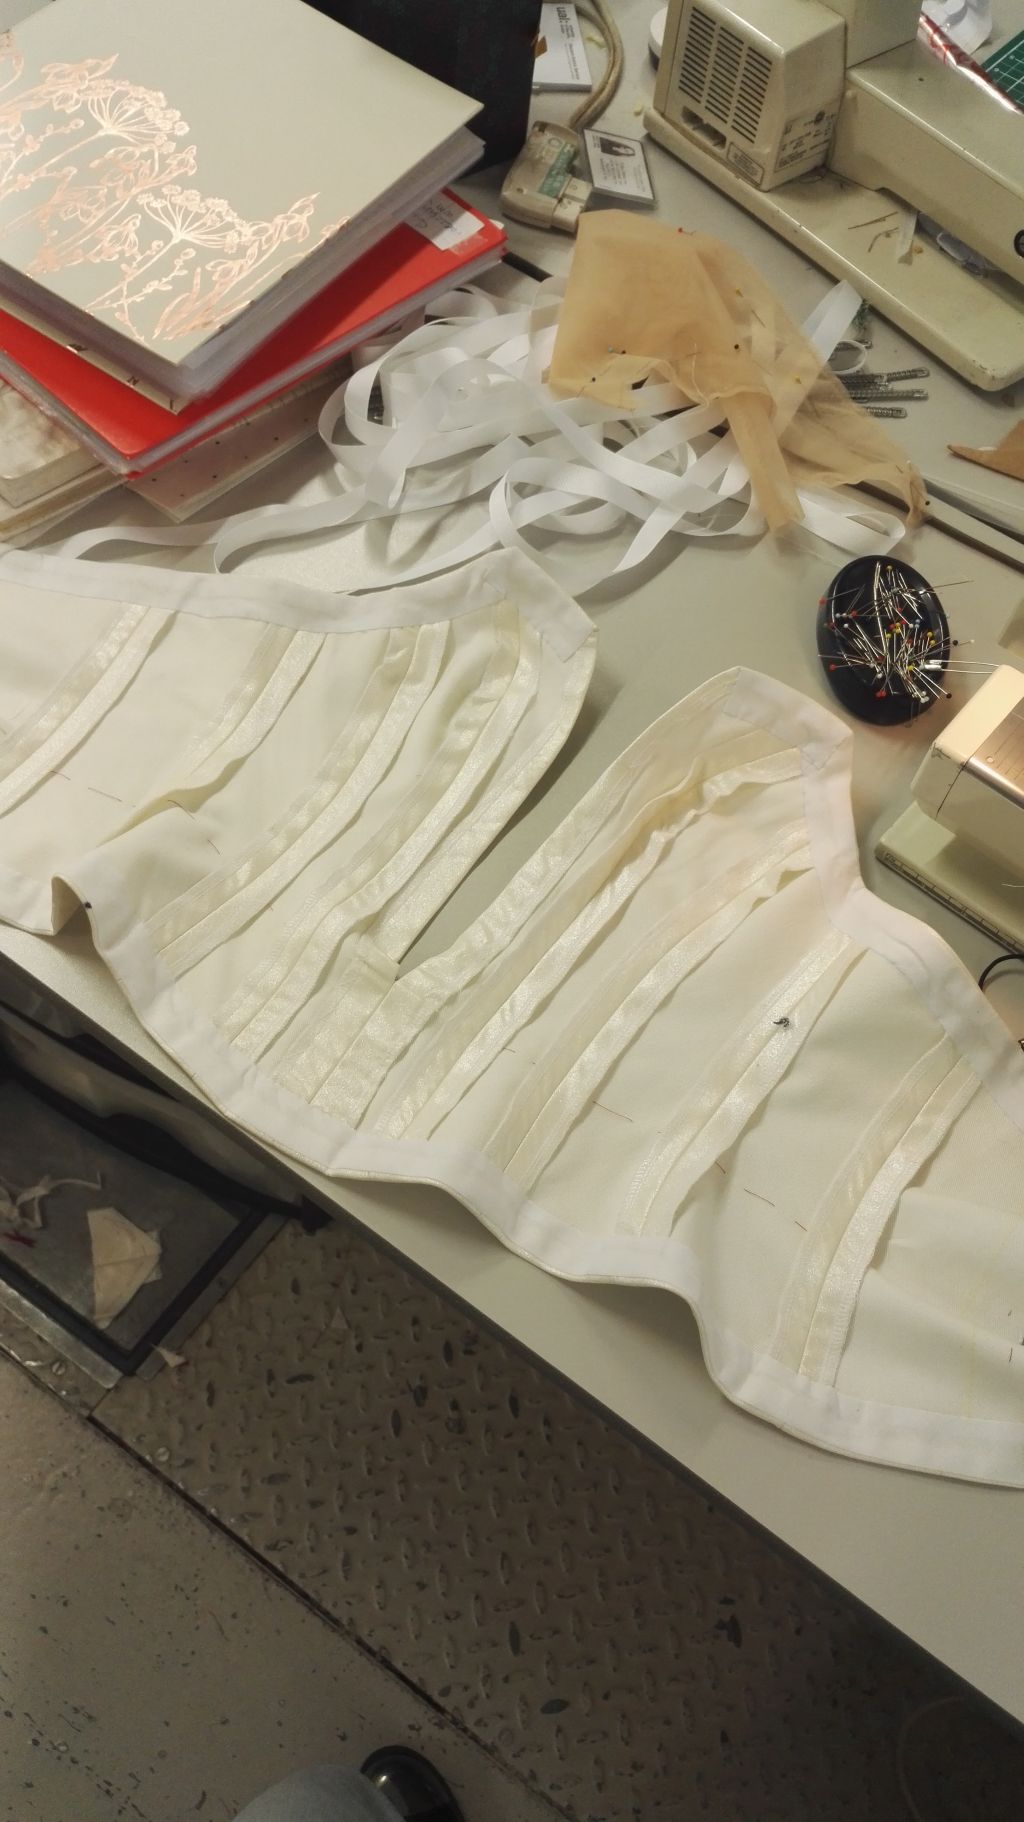

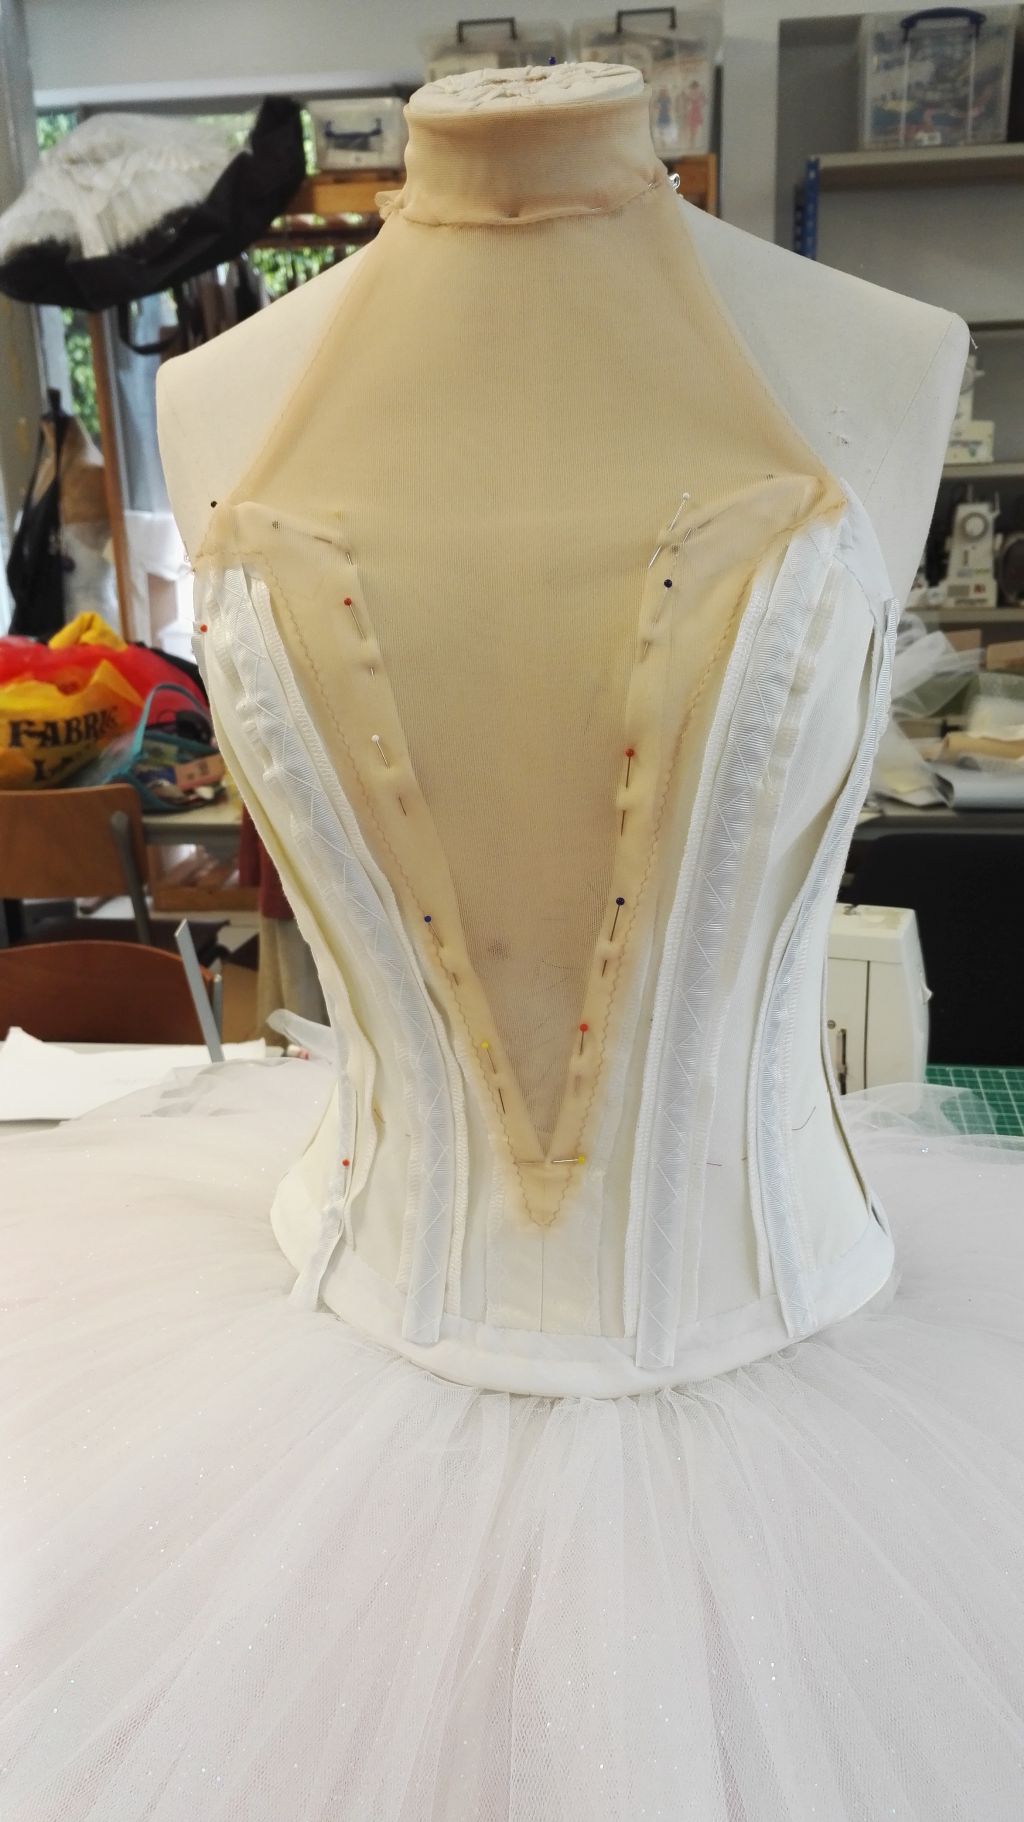
A lot of work goes into finishing off the inside of a ballet bodice. Usually the edges would be finished with piping but Niamh and I wanted a plain and flat bodice so I faced all edges with bias tape. To ensure a perfect fit without wrinkling ballet bodices are always boned with spiral boning. This boning can follow curves but it still very strong. It is encased in petersham boning channels that are herringbone stitched to the seam allowances by hand. This is advantageous because it makes it easy to just remove the channel for alterations and sew it on again. The minx net was also sewn to the bodice with a herringbone stitch.
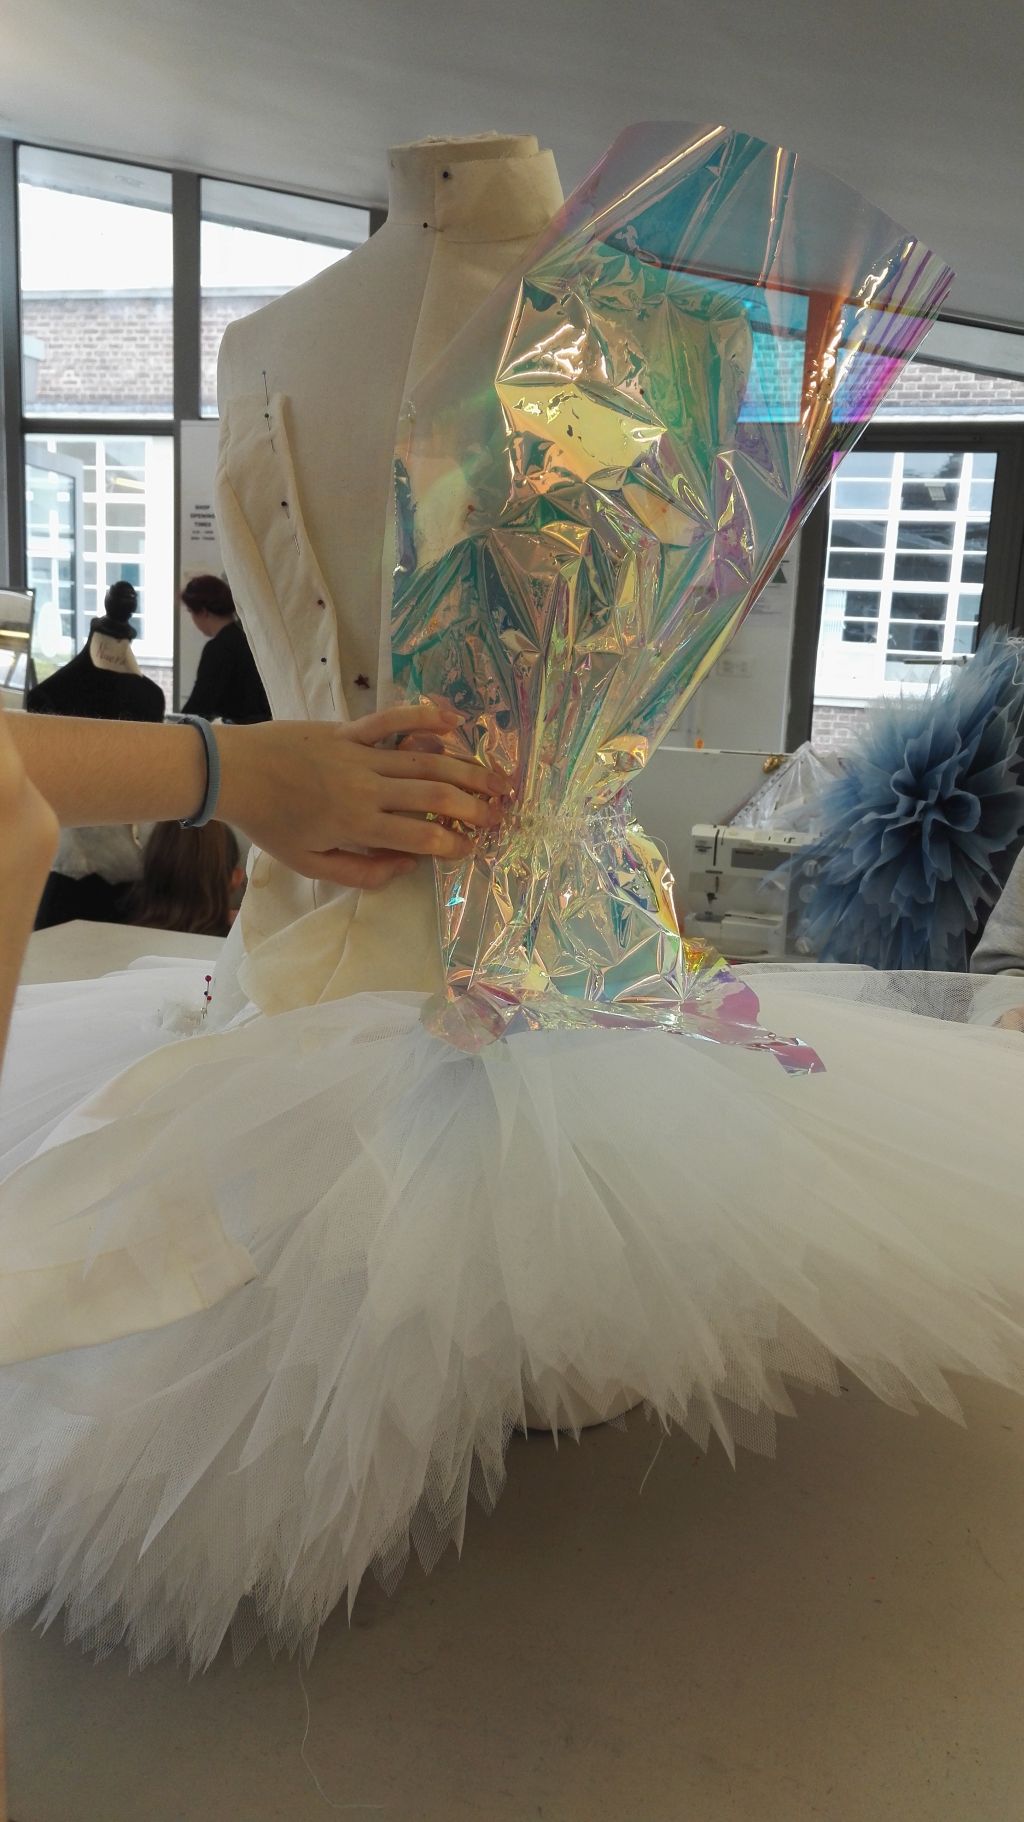


The original design included a sculptural draped element made out of iridescent PVC and iridescent foil that was discarded as both me and the course leader had doubts about feasibility and quality of the outcome. The second idea idea was to cut glass-like mosaic pieces out of PVC and spread them on bodice and tutu focussing on the waist area.


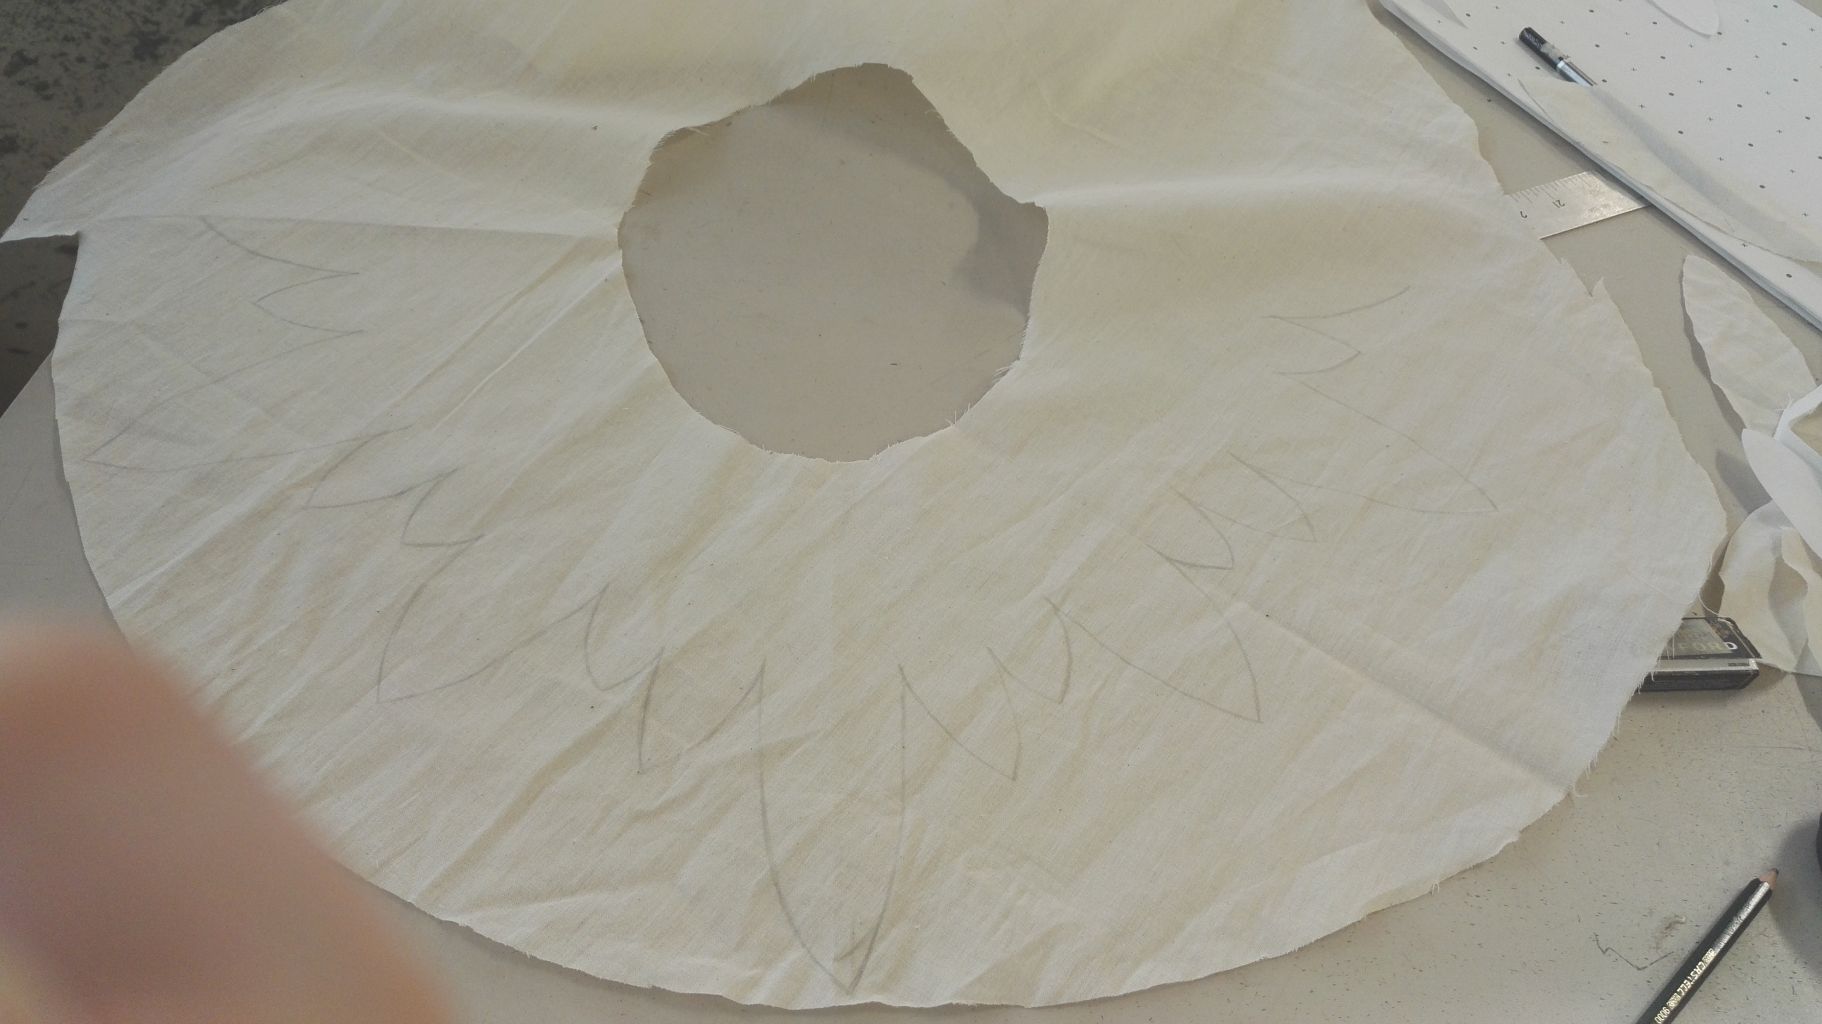
The design for the final tutu plate was decided on very late. Initially there was none in Niamh’s drawing but at some point we realised that we need something to make the transition from the creamy white of bodice into the pure white of the tutu smoother. We experimented by draping some calico shapes but they either seemed to fairylike or too princessy. Since a lot of peers had commented that the costume was giving them mermaid vibes I suggested we go for something more feathery and possibly a bit more messy than a geometric design. So we came up with the idea that can be seen on the right side of the gallery. I cut an oval piece of calico that was fitted to match the shape of the tutu and arranged “feathers” of different sizes and on it. The outline of this quarter was mirrored to create the top plate.

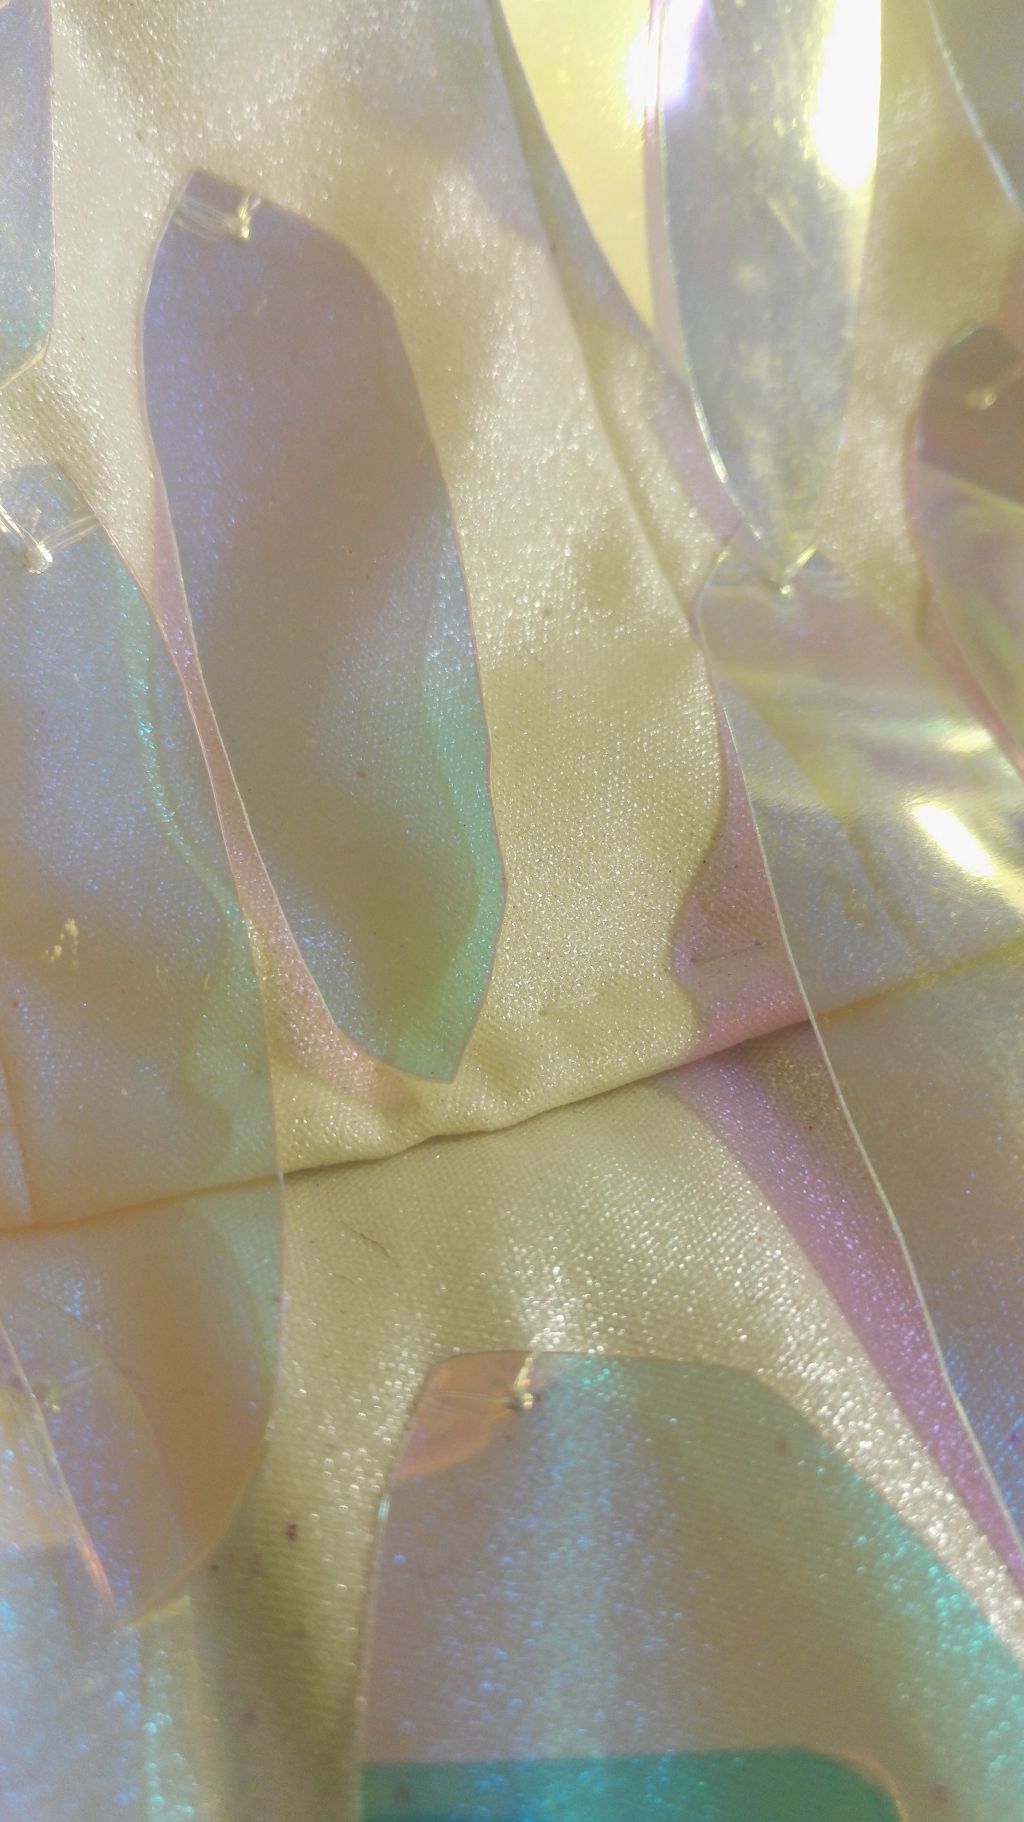


Time to add the finishing touches and decoration. The elastics in the leg seams are sewn together and the bias channel over it closed. Niamh cut all the PVC feathers and I individually sewed them to the costume with transparent thread, this took about a day. The minx net panel is covered with iridescent shell sequins that are meant to look like a hummingbird’s chest. They are all hand-sewn on as well. Unfortunately I had ordered only 200 and ran out shortly before finishing. To make matters worse, the seller was on holiday so I had to provisionally cover up the bare patch of net with the 4 sequins I had left and leave the strap around the neck uncovered for hand in.


I draped a little cape with some white chiffon from the scrap bin so no extra cost on that, yay! As you can see everything is closed with hooks and eyes as that is the most durable option. A placket in the centre back of the bodice ensures that there are no awkward gaps.

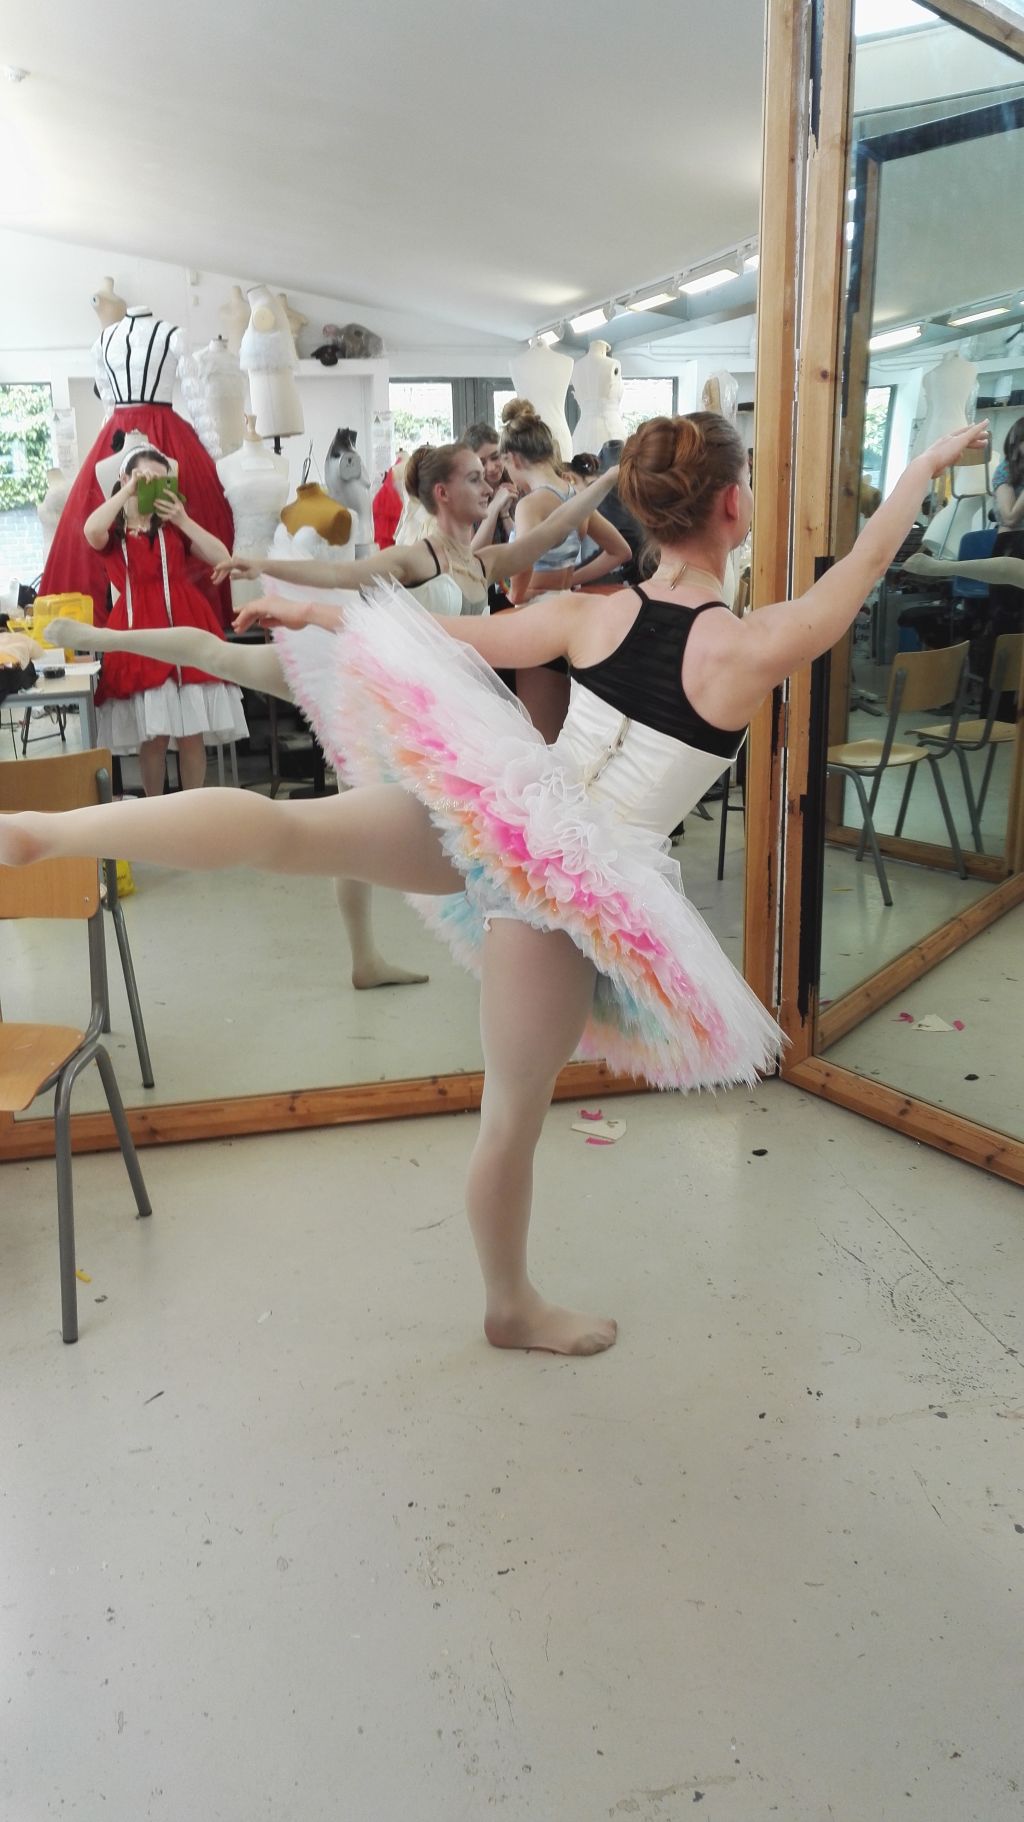
And we’ve reached the end already! Here’s the finished tutu feat. Niamh being cute and overjoyed ♥️
I hope this was an interesting read and uncovered some of the tutu mysteries.
Seeya soon for a summary of my 1890s Canary corset 👋

how i know the lent of the tool before i pleat it and gather on hitch layer
LikeLike
I’m sorry I don’t understamd what you mean, ‘the lent of the tool’?
LikeLike
she was probably meaning the length of the tulle.
LikeLike
Now I will leave my comments. I thoroughly enjoyed this article. I think I would love to make a tutu as part of my bucket list of things to do.
I imagine the boning could be purchased at a corsetry supply shop.
Did I understand correctly that elastic is used instead of boning on the one layer of the tutu? You said you used something else that left it unruly and then said elastic. I am from USA so wanted to be sure of what was used in the channel layer of tutu. it seems like elastic would make sense as one can pull it up till it is correct diameter…
The dagging is so precise – is there a special scissors or cutter for that? they look larger than what a scissors would be so I was wondering about this special part of equipment.
Finally where would one find these supplies? (whatever the dagger machine is, the basic ballet patterns, etc.)
Thank you for writing such a wonderful article and the firebird costume reminds me of a “Fire and Ice” sort of firebird. Well done and beautiful costume!
LikeLike
Thank you so much for unveiling the mystery! Couldn’t find info anywhere else and those tips and tricks are so helpful. Yours looks fantastic and I’m going to try a simplified child’s one for a budding ballerina
LikeLike
You’re welcome, I totally agree this sort of information is very hard to find for some reason! Good luck making your own, I bet it will look very cute :3
LikeLike
What dance company did you make these for? Can I find them YouTube to see them in action?
LikeLike
Hi there, this was never made for a dance company, it was a practice piece in for study!
LikeLike
Hi I’m just wondering where you went to study to make tutus
LikeLike
Hi, I did the BA (Hons) Costume for Theatre and Screen at Wimbledon College of Arts but there are certainly other courses that teach this skill!
LikeLike